


Need Help?
For issues related to product availability, services or concerns.
ask an expert
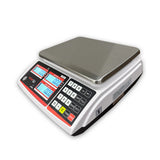
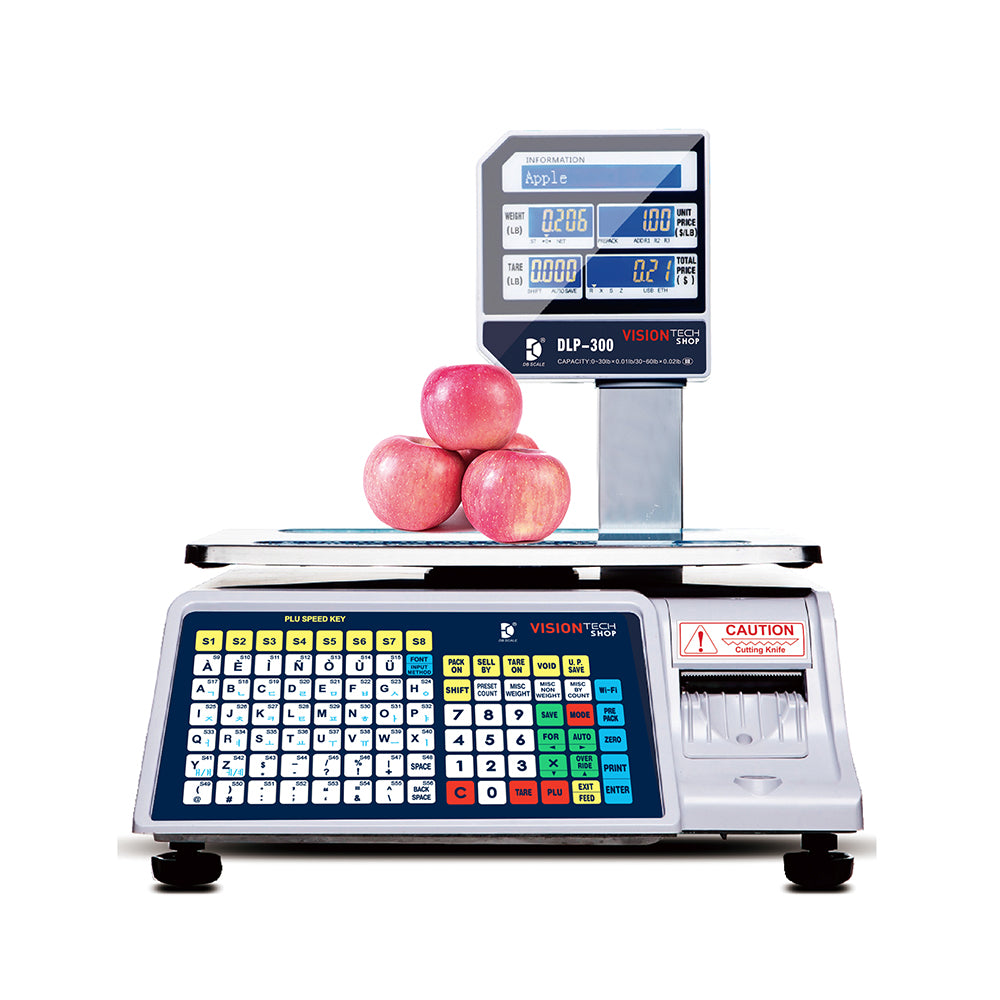
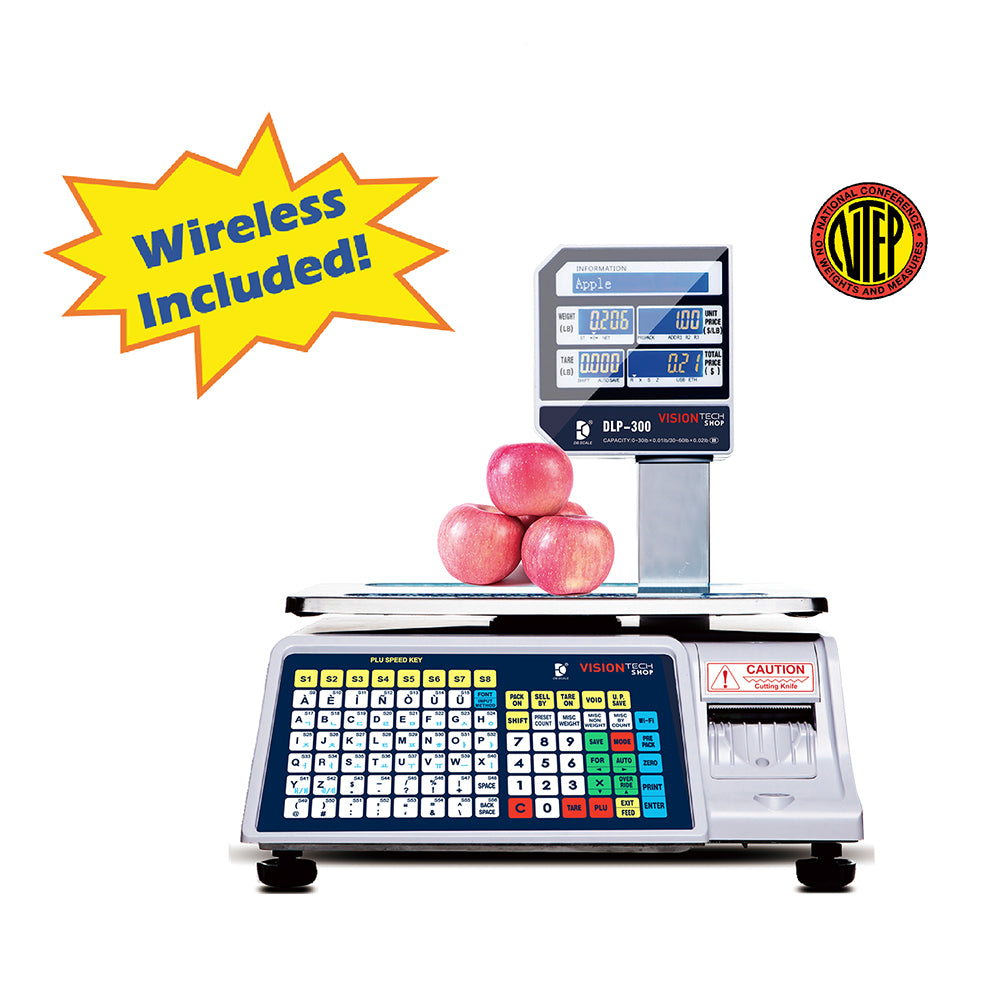
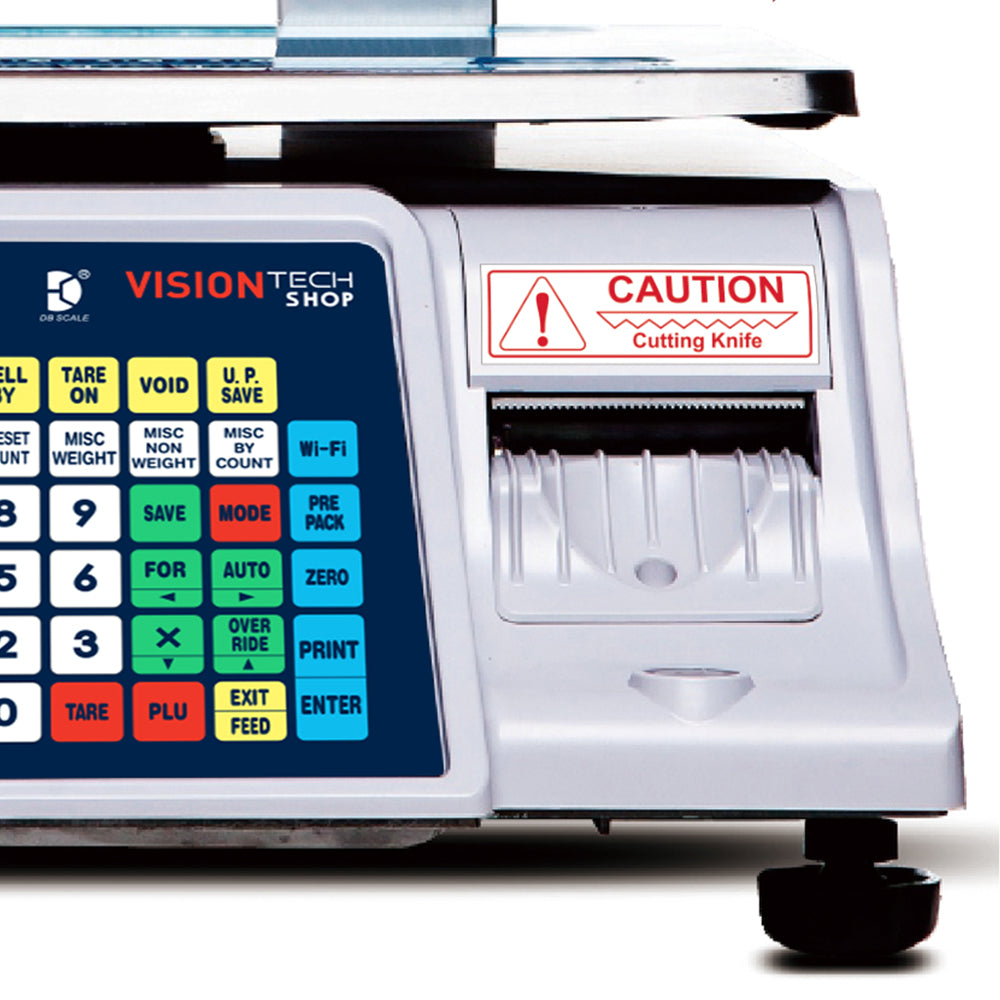
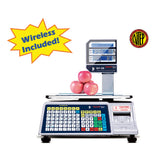
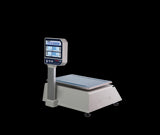
[VisionTechShop] DLP-300 Label Printing Scale Series
DLP-300 Label Printing Scale
You may also be interested


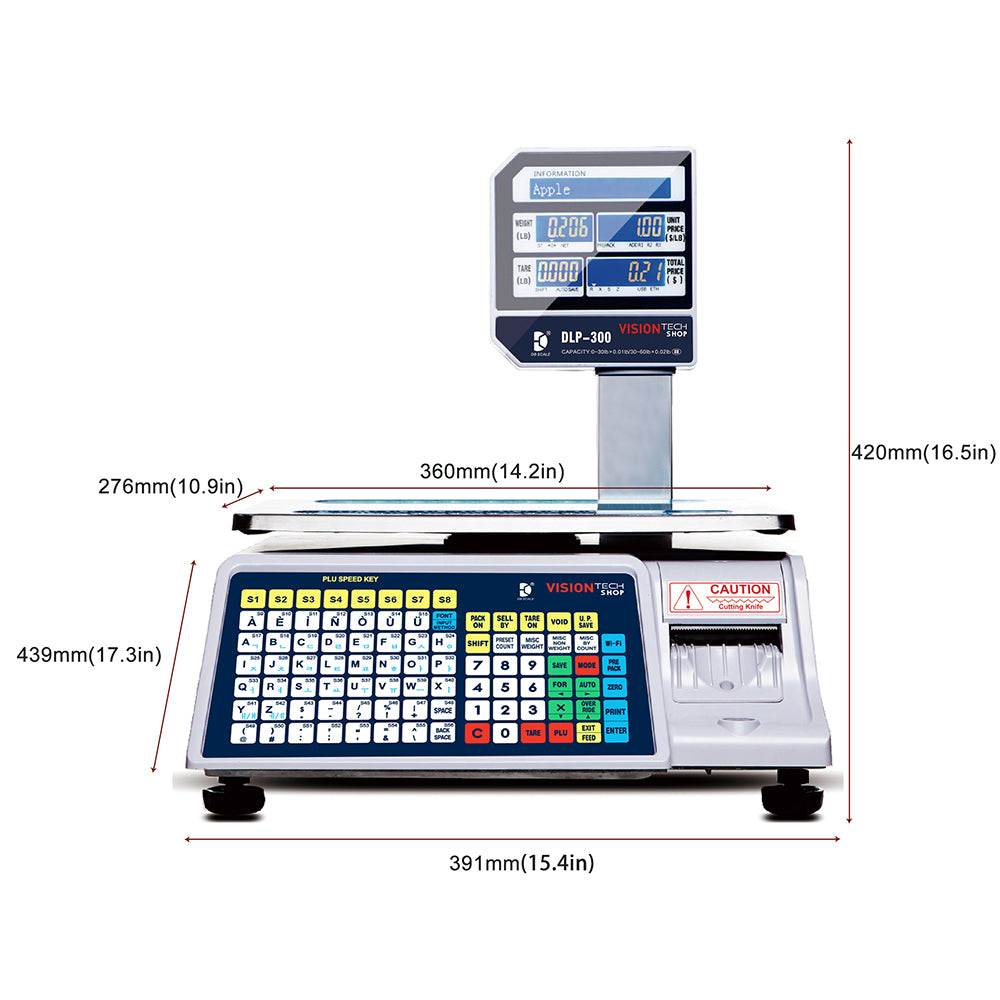
| Models | DLP-300 Series | |
| Capacity & Readability | lb | 30/60 |
| 0.01/0.02 | ||
| Resolution | 1/3,000(Dual Interval) | |
| Display type | LCD, Dot Matrix LCD with Back light | |
| Printing speed (mm/sec) | 95 | |
| Label size (mm) | Width: 40 ~ 60, Length: 30 ~ 120 | |
| Operating temperature (℉/℃) | 14 ~ 104/-10 ~ +40 | |
| Power | AC 120V, 50/60Hz | |
| Platter size (in/mm) (W x D) | 14.3 x 11.1/364 x 281 | |
| Dimensions (in/mm) (W x D x H) | 15.4 x 17.3 x 21.2/391 x 439 x 541 |
|
| Product Weight (lbs/kg) | 25.5/11.5 | |
| Ship Weight (lbs/kg) | 28.5/12.9 | |
| Warranty | One year | |
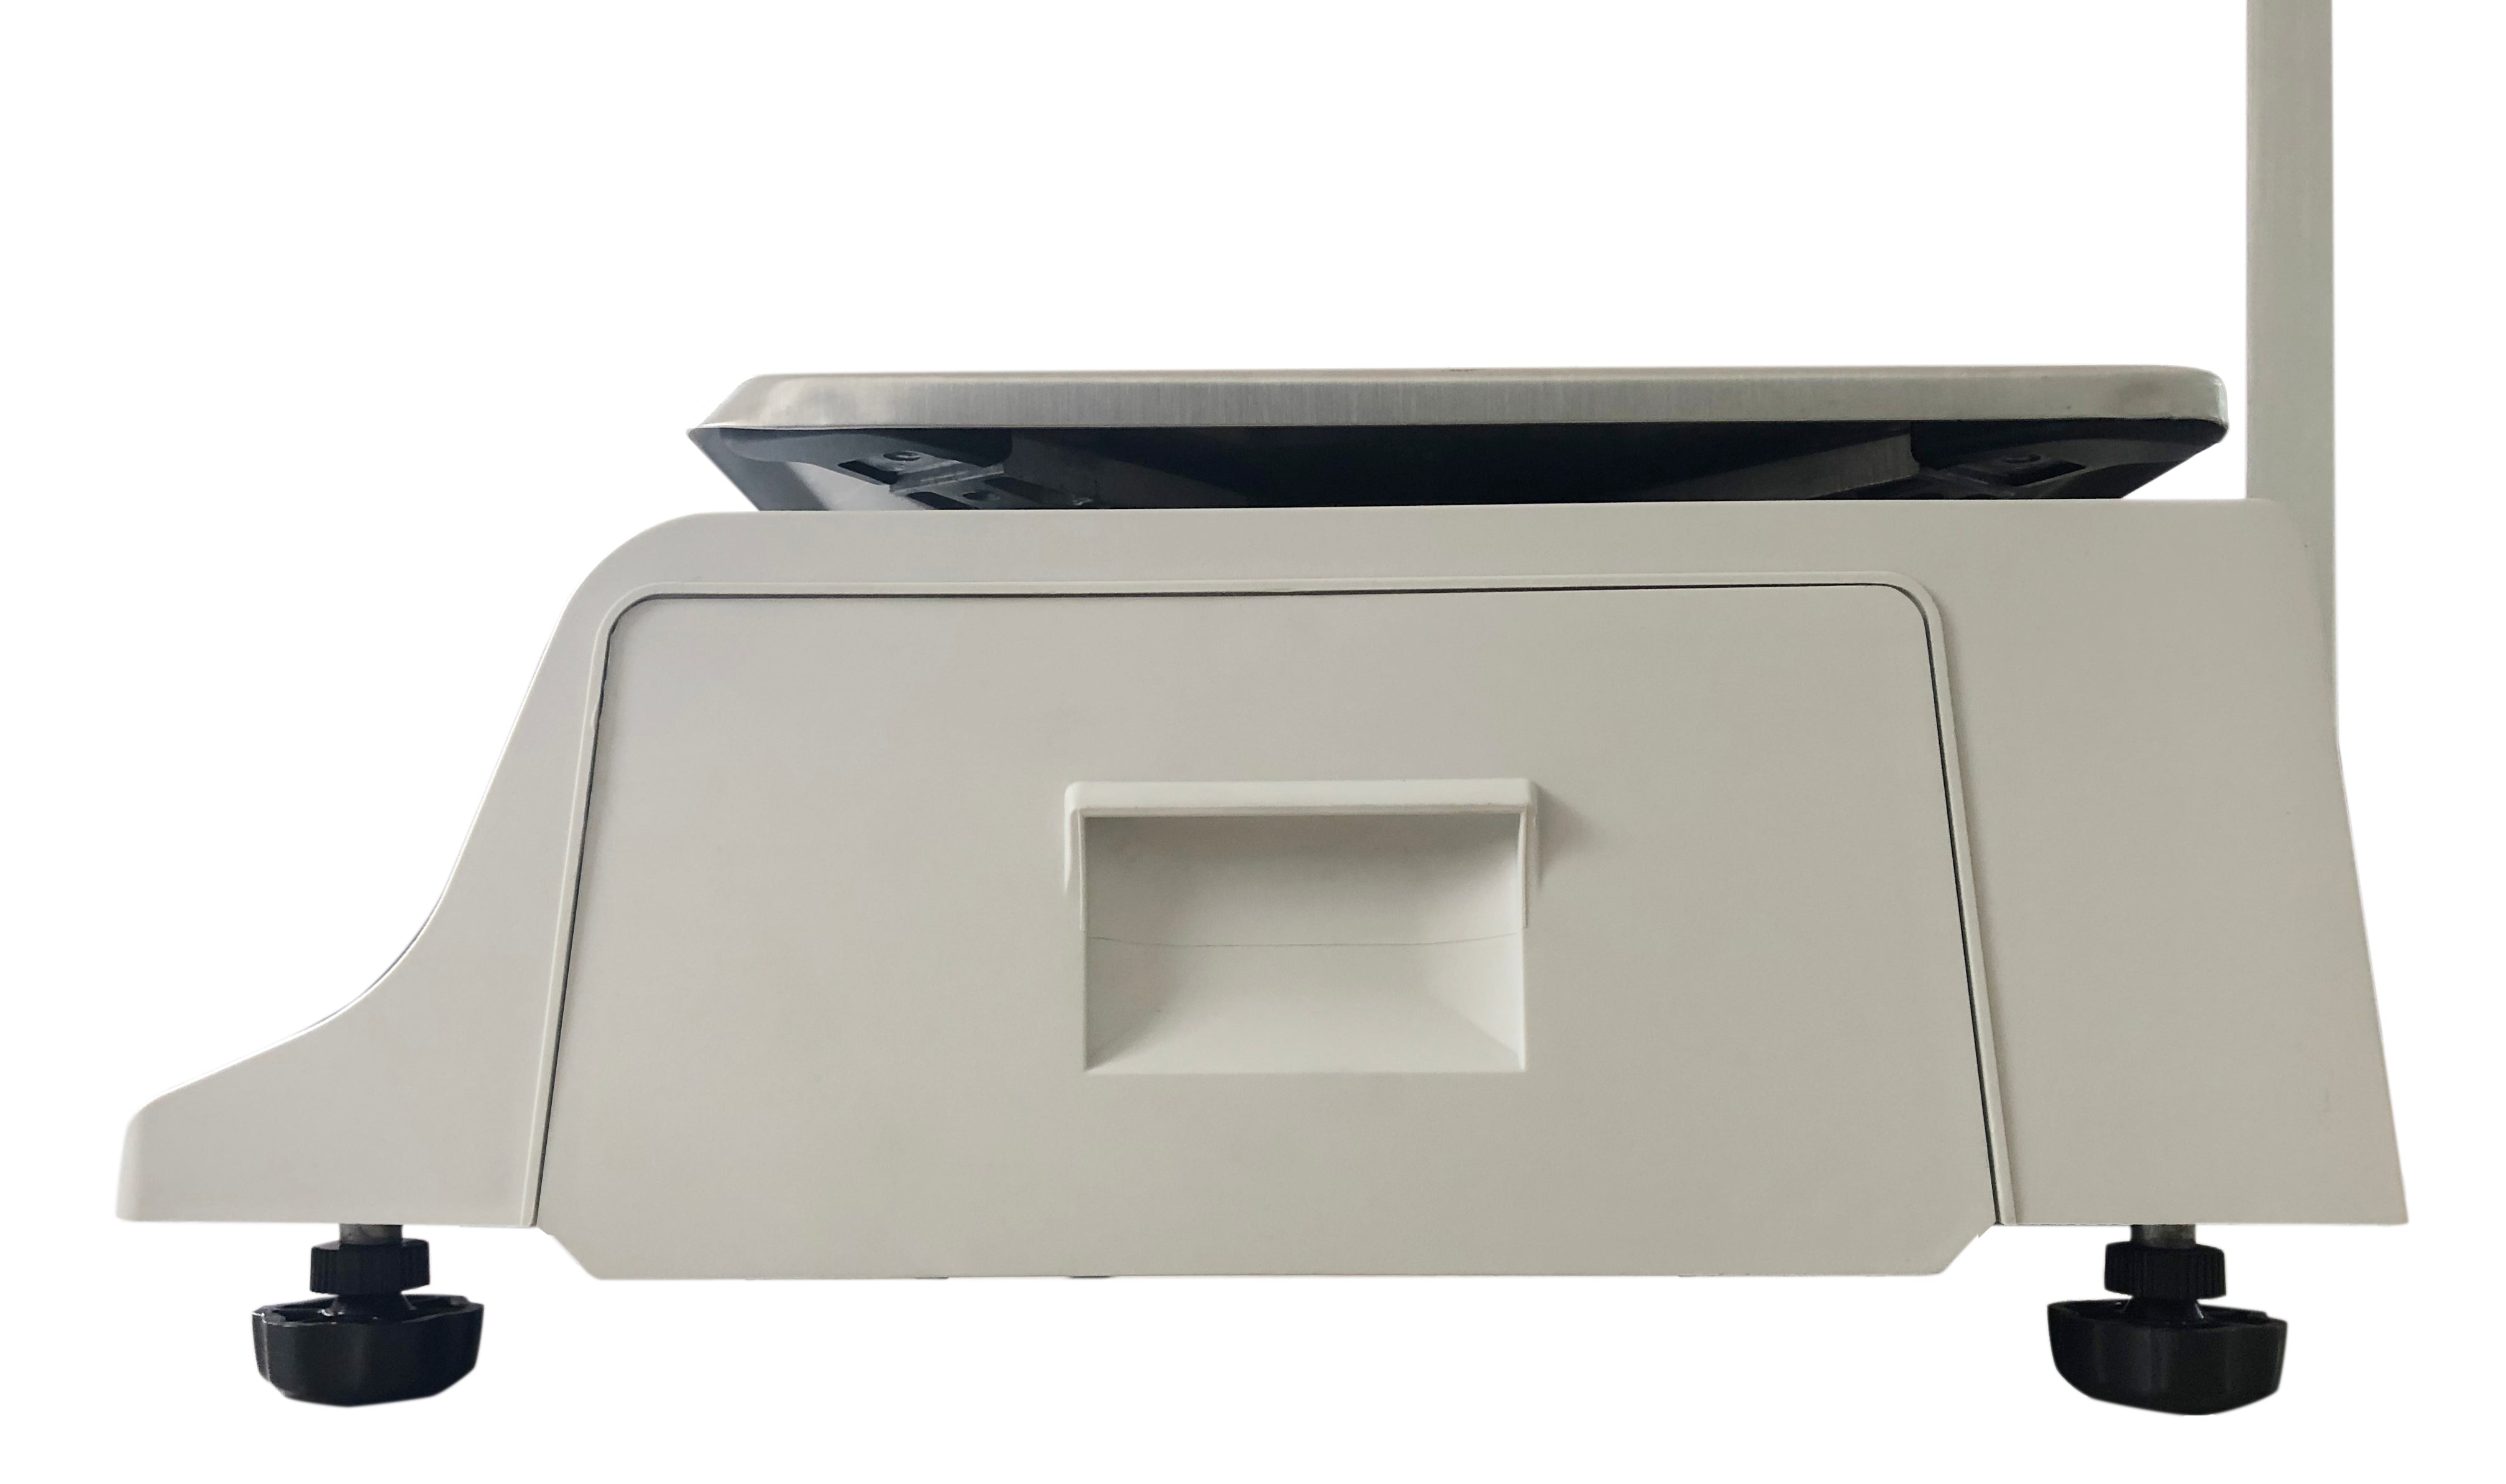
Dimensions

Customer Reviews
Quick Reference Sheets
#1 How to Adjust Label Feed DLP-300

Please see the video about label feed adjustment. https://youtu.be/LeaeuKRDc8s
#2 How to Change Label Format ? DLP-300

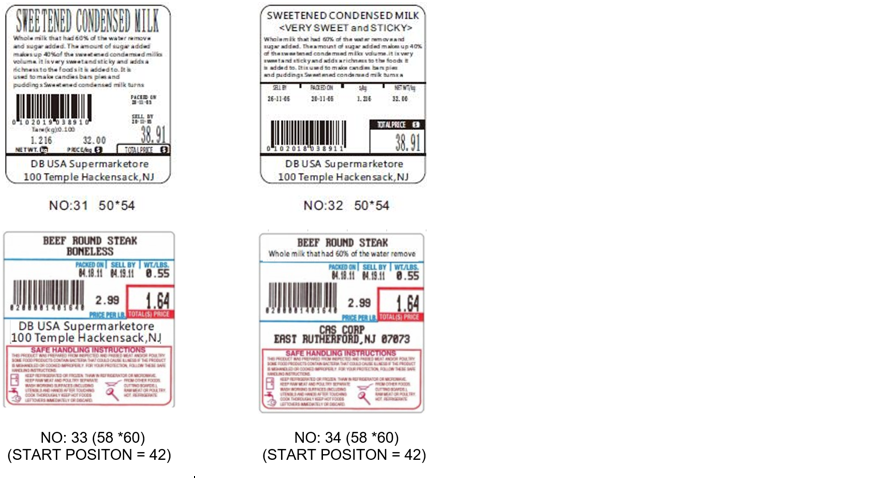
#4 How to Create Speed Keys
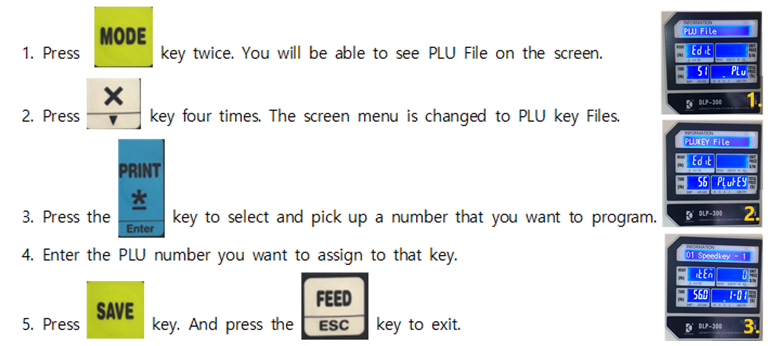
Please see the video about creat Speed Keys. https://www.youtube.com/watch?v=xfCMC10eOBQ
#5 How to show/hide PLU menu categories

Please see the video about show/side PLU menu categories. https://www.youtube.com/watch?v=uYuwN9Sfj5A
#6 How to Install XDB Manager
2. Click on Download tab under product image.
3. Click on "XDB Manager Software" link.
4. Download link is also provided in description to our youtube video.
5. Extract downloaded file to directory of your choice.
6. Right click "XDBManager" file.
7. Select "Create shortcut" on menu.
8. Cut & Paste shortcut to desktop.
9. Click on "More info" on windows warning.
10. Click "Run anyway"
Please see the video about Install XDB Manager. https://www.youtube.com/watch?v=NXq3KQRLG9k
#7 How to Create a New PLU Code
2. Enter the PLU unmber you wish to create and press the "PRINT" key.
3. Enter the PLU name (ex. RIB EYE) and press "PRINT" key.
4. Enter the unit price and press the "PRINT" key.
5. Enter the PLU Type and press the "PRINT" key.
* No. 0 (Weight) | No. 1 (Non-weight) | No. 2 (By count)
6. Enter the Item code and press the "PRINT" key.
7. Enter the sell by date and press "PRINT" key.
8. Enter the sell by time and press "PRINT" key.
9. Enter the tare weight (if you want) and press "PRINT" key.
10. Enter the qty and press the "PRINT" key.
11. Enter the Ingredient message and press the "PRINT" key.
** Number 0 means not to print | Number 1 means to print
12. Enter the print sell by date status (0: No, do not print | 1: Yes print) and press "PRINT" key.
13. Enter the print sell by time status (0: No, do not print | 1: Yes print) and press "PRINT" key.
14. Enter the print cook by time status (0: No, do not print | 1: Yes print) and press "PRINT" key.
15. Enter the print pake date status (0: No, do not print | 1: Yes print) and press "PRINT" key.
And enter the discount status(0 or 1) and press the "PRINT" key.
If you get back to PLU NO section, you are done to make a PLU code.
Press "FEED" key twice to see if you make a code well.
Enter the PLU unmber you just cerated and press "PLU" key. And press "PRINT" key.
Please see the video about create a New PLU Code. https://www.youtube.com/watch?v=_Gizpf0o04c
#8 How to enter The Store Information
1. Press "MODE" key twice and press "X" key.
2. Press "PRINT" key and enter shop number. And press "PRINT" key.
3. Enter the first line of shop information. Which is store name.
You can clear the existing information by pressing the "C" key.
4. Type your store name.
5. Press "X" key to go to the next line.
Enter the second line information. It can be either phone numbers or address.
If you want to add more information, you can press "X" key to add more lines.
6. To finish, press the "PRINT" key and then "SAVE" key.
Please see the video about enter the store information. https://www.youtube.com/watch?v=jko0BeXwB4U
#9 How to wirelessly connect the scale with the XDB Manager (New Version → #37)
Please see the video about wirelessly connect the scale with XDB Manager.https://www.youtube.com/watch?v=PNNzhwGWfWI
Setting up a WIFI network on the DLP-300 scale.
1. Press and hold the [ZERO] key and press “1”+”1”+”2”
2. Press the [PRINT] key, press “1” and press the [PRINT] Key.
3. Press [x] key 9 times. You will see “H11” on the TARE display and “WIFI IP” on the INFORMATION display.
4. Press the [PRINT] key then press “192”. Press [PRINT] then “168”. Press [PRINT] then “43”. Press [PRINT] then “21” then [PRINT]. (This is the number you set as your Scale IP address on the computer from the previous section)
5. Press the [PRINT] key 5 times. You will see “H13” on the TARE display and “WIFI Gateway” on the INFORMATION display.
6. Press the [PRINT] key then press “192”. Press [PRINT] then “168”. Press [PRINT] then “43”. Press [PRINT] then “1” then [PRINT]. (This number is only for our network. You might have a different #).
7. Press the [PRINT] key then press “192”. Press [PRINT] then “168”. Press [PRINT] then “43”. Press [PRINT] then “1” then [PRINT]. (This number is only for our network. You might have a different #).
8. Now, you will see “H15” on the TARE display and “SSID” on the INFORMATION display.
9. Press the [BROWSE] key. Press the [OVER RIDE] key until you find your WIFI SSID then press the [PRINT] key.
10. Press the [PRINT] key 3 times.
11. Enter the WIFI password and press the [PRINT] key.
12. Press the [PRINT] key 2 times and press [SAVE].
Connecting the DLP-300 scale with XDB manager software
1. First of all, if you want to find your PC IP address and DNS Servers IP address, go to “Internet Access” - "Properties". You will see your PC IP address, DNS Servers IP address, WIFI SSID, and etc.
2. Open XDB Manager software.
3. In section [Dept-Mg-Scale], right click and select [Add DEPT].
4. Fill out the Dept No. and Dept name. And press [Save] and [Close].
5. Right click on the Department. And select [Add MainGroup]
6. Fill out [MG NO.] and [MainGroup Name]. Select the Department. And press [Save] and [Close].
7. Click the Department. "DB MART" and right click on "Vegetable"and select [Add Scale].
8. Fill out [ScaleNo], [IP Address] for scale IP address. We put 192.168.43.21 for scale IP address. And press the [Save] and [Close].
9. Search “CMD”(or “Command Prompt”) on your PC to run Command Prompt. Enter “ping 192.168.43.21” which is your DLP-300 scale IP address. And press ENTER. If you get a reply, then your DLP-300 scale is connected correctly to your WIFI network.
10. You just finished adding a scale to the XDB manager software. Now, I will show you how to add a PLU to the XDB manager. Enter the PLU #, Item Code, Name, Unit Price, and press the [SAVE] key. You can add some Ingredients as well.
11. Let’s try to download PLU data for testing. Click “TCP/IP” on the top menu bar of the XDB manager.
12. Click “Download All PLU” and click the scale #. Then click [OK].
13. Once you see the 100% green bar in the Progress Bar, the PLU data has properly downloaded. You will be able to call PLU data from your scale.
#10 How to connect "Directly" a DLP-300 scale to XDB Manager.
Please see the video connect directly a DLP-300 to XDB Manager with RJ45 Cable.
https://www.youtube.com/watch?v=qvktR98osB0
How to connect directly a DLP-300 to XDB Manager with RJ45 Cable.
There are two ways to connect your DLP-300 scale with XDB manager by wired network.
1. DLP-300 directly connect to XDB manger
2. DLP-300 connect to XDB manger via your network.
I will explain how to connect (1) DLP-300 directly connect to XDB manger on this video.
1. Plug a RJ45 cable (: Ethernet cable) from PC to DLP-300 directly.
2. Set up or see your PC IP address. Go to Network – Change adapter options.
And go to the properties. Click TCP/IPv4 – Properties. Then you can see your PC IP address.
(Our is 192.168.1.50)
3. Press and hold the [ZERO] key and press “1” +”1” +”2. If you want to set the scale # as #1, then
4. Press the [PRINT] Key, press “1” and press the [PRINT] Key.
5. Press [x] key. You will see “H03” on the TARE display and “Ethernet IP” on the INFORMATION display.
6. Press the [PRINT] key then press “192”. Press [PRINT] then “168”. Press [PRINT] then “1”. Press [PRINT] then “51” then [PRINT]. (This is the number you want to set as your Scale IP address)
7. Press [SAVE] key.
Connecting the DLP-300 scale with XDB manager software.
1. Open XDB Manager software.
2. In section [Dept-Mg-Scale], right click and select [Add DEPT].
3. Fill out the Dept No. and Dept name. And press [Save] and [Close].
4. Right click on the Department. And select [Add MainGroup]
5. Fill out [MG NO.] and [MainGroup Name]. Select the Department. And press [Save] and [Close].
6. Click the Department. "DB MART" and right click on "MEAT" and select [Add Scale].
7. Fill out [ScaleNo], [IP Address] for scale IP address. We put 192.168.1.51 for scale IP address. And press the [Save] and [Close].
8. Search “CMD”(or “Command Prompt”) on your PC to run Command Prompt. Enter “ping 192.168.1.51” which is your DLP-300 scale IP address. And press ENTER. If you get a reply, then your DLP-300 scale is connected correctly to your PC
9. You just finished adding a scale to the XDB manager software. Now, I will show you how to add a PLU to the XDB manager. Enter the PLU #, Item Code, Name, Unit Price, and press the [SAVE] key. You can add some Ingredients as well.
10. Let’s try to download PLU data for testing. Click “TCP/IP” on the top menu bar of the XDB manager.
11. Click “Download All PLU” and click the scale #. Then click [OK].
12. Once you see the 100% green bar in the Progress Bar, the PLU data has properly downloaded. You will be able to call PLU data from your scale.
Now, I will show you how to download store name to the DLP-300 from XDB Manager.
1. Click Config on top mane and click Shop TextConfig.
2. Click ShopName01 and put store information on Content.
We put our company information “DB MART 201.123.4567” “100 TEMPLE AVE, HACKENSACK, NJ 07601”
And Click Download.
3. Click scale # - ok. Once you see the 100% green bar in the Progress Bar, the store name has properly downloaded.
4. Click [Apply] and [SAVE]
#11 How to print labels with the backing paper on
Please see the video about print labels with backing paper on. https://www.youtube.com/watch?v=60lAvdDDUew
1.
Please take out the cartridge from the scale and cut the label nicely. And please put the cartridge back.
2. You will see the message “Press Feed key” or “Please Remove La”. This is fine. Go to the next step as is.
There are two ways to set up printing labels with backing paper.
The first way is the following :
1. Press the [ZERO] key and press “1”-”4”-”1”
2. Press “5”-“3” then the [X] key. You will see “Enable ROM” on the INFORMATION display.
3. Press “0” which will disable the peel off sensor. And press [PRINT] then [SAVE].
4. Press the [FEED] key and call a PLU. Let’s call PLU #2 and print 5 labels.
Then, press “2” - [PLU] - [Pre Set Count] - “5” - [PRINT] – [FEED].
The second way is the following :
1. Press the [ZERO] key and press “1”-”1”-”3”
2. Press the [X] key 4 times. You will see “P05” on the TARE display and “Enable ROM” on the INFORMATION display.
3. Press [PRINT] and press “0” which will disable the peel off sensor. And press [PRINT].
4. You will see “P06” on the TARE display and press [SAVE].
5. Press the [FEED] key and call a PLU. Let’s call PLU #2 and print 5 labels.
Then, press “2” - [PLU] - [Pre Set Count] - “5” - [PRINT] – [FEED].
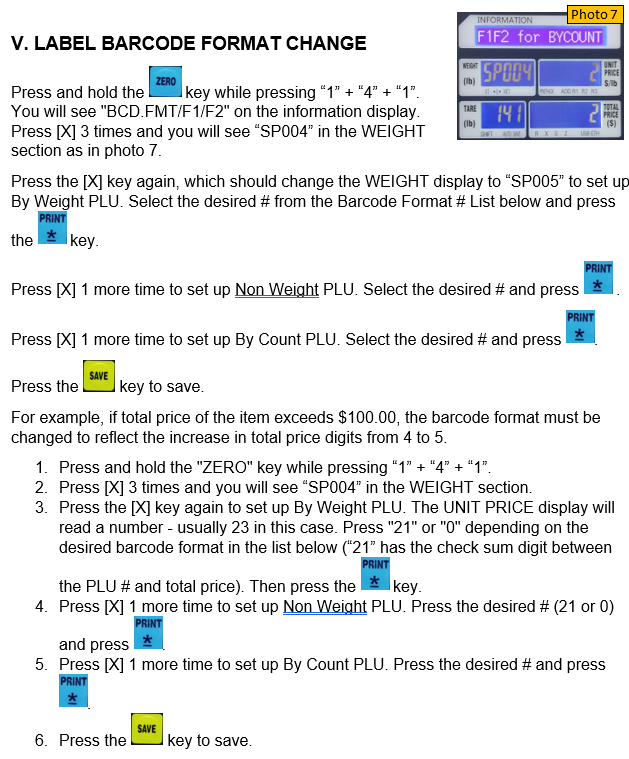
#12 Print a label with the total price exceeds $100.00
Please watch the video. https://www.youtube.com/watch?v=kSn2Um_PLlo
The main issue here is usually that the total price of the item exceeds $100.00 and the barcode format must be changed to reflect the increase in price digits from 4 to 5. Please follow the instructions below:
Press and hold the "ZERO" key while pressing “1” + “4” + “1”. You will see "BCD.FMT/F1/F2" on the information display.
Press [X] 3 times and you will see “SP004” in the WEIGHT section.
Press the [X] key again, which should change the WEIGHT display to "SP005", to set up By Weight PLU's barcode. The UNIT PRICE display will read a number - usually 23 in this case. Press "21" or "0" depending on the desired barcode format in the list below (“21” has the check sum digit between the PLU # and total price). Then press the "PRINT * ENTER" key.
To set up Non Weight PLU's barcode, press the desired # ("21" or "0") and press "ENTER".
To set up By Count PLU's barcode, press the desired # and press "ENTER".
Press the "SAVE" key to save.
Barcode Format # List (D : Department / P : PLU # / $ : Total Price / W : Weight / C : Check sum)
0. DDPPPPP$$$$$C (EAN13)
21. DDPPPPC$$$$$C
23. DDPPPPPC$$$$C
#13 How to fix the "Amount Overflow" error?
The main issue here is usually that the total price of the item exceeds $100.00 and the barcode format must be changed to reflect the increase in price digits from 4 to 5. Please follow the instructions below:
Press and hold the "ZERO" key while pressing “1” + “4” + “1”. You will see "BCD.FMT/F1/F2" on the information display.
Press [X] 3 times and you will see “SP004” in the WEIGHT section.
Press the [X] key again, which should change the WEIGHT display to "SP005", to set up By Weight PLU's barcode. The UNIT PRICE display will read a number - usually 23 in this case. Press "21" or "0" depending on the desired barcode format in the list below (“21” has the check sum digit between the PLU # and total price). Then press the "PRINT * ENTER" key.
To set up Non Weight PLU's barcode, press the desired # ("21" or "0") and press "ENTER".
To set up By Count PLU's barcode, press the desired # and press "ENTER".
Press the "SAVE" key to save.
Barcode Format # List (D : Department / P : PLU # / $ : Total Price / W : Weight / C : Check sum)
0. DDPPPPP$$$$$C (EAN13)
21. DDPPPPC$$$$$C
23. DDPPPPPC$$$$C
Please watch the video for "Amount Overflow" error. https://www.youtube.com/watch?v=kSn2Um_PLlo
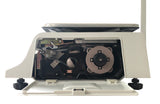
#14 How to Change Label Roll
Please see the video about change Label Roll. https://www.youtube.com/watch?v=o7pNC-QRPLU
1. Open the side door.
2. Turn the print head lever clockwise and remove the cassette.
When pulling out the cassette, it helps to use both hands and apply a downward pressure while removing it.
3. Remove both the backing paper holder clip and label roll holder.
4. Take off 4 to 5 stickers and place roll of labels on the label roll spool.
5. Take the end of the label roll and place it between the black sensor plate then thread the paper over the front metal bars.
Please do not thread the label paper between the front bars.
Threading the label paper between the bars will produce an error.
6. Pull out enough paper to go over the white plastic roller and under and around the black backing paper spool.
Make sure not to slide the label roll under the white plastic roller.
Place the clip holder to secure the label backing paper.
7. Place the label roll holder on the label roll spool and rotate it 15 degrees clockwise.
8. Adjust the white label paper guide to fix the label into the right position.
9. Install the cassette with labels into the scale.
10. Turn the print head lever counterclockwise to lock it. Then close the side door.
11. Press the [FEED] key a few times so the scale can recognize the size of the label.
There is also a brief installation guide on the side door that you can use as a reference
If you get the label, you are all set.
There is also a brief installation guide on the side door.
#15 How to change the department # of barcode? DLP-300
Press and hold [ZERO] key and press “1” + “4” + “1”. You can see "BCD.FMT/F1/F2" on the display.
Press [PRINT] key. Press “9” + “9”.
Press [PRINT] key and press [SAVE] key to save and exit.

Please see the video about change the department # of barcode. https://www.youtube.com/watch?v=gmw8RUERp2M
#16 How to change LABEL BARCODE FORMAT?
Press and hold [ZERO] key while pressing “1” + “4” + “1”. You can see "BCD.FMT/F1/F2" on the display.
Press [X] 3 times. You can see “SP004” in the WEIGHT section on the display.
Press the [X] key again, which should change the WEIGHT display to “SP005” to set up By Weight PLU.
Select the desired # from the Barcode Format # List below and press [PRINT] key.
Press [X] 1 more time to set up Non weigh PLU. Select type # and press [PRINT] key.
Press [X] 1 more time to set up By count PLU. Select type # and press [PRINT] key.
Press [SAVE] key to save.
Please see the video about change label barcode format. https://www.youtube.com/watch?v=kSn2Um_PLlo&t=3s
#17 How to solve "Please Remove La" message
Please watch the video about "Please Remove La" message. https://www.youtube.com/watch?v=Ga6cg_ElPwQ
The “Please Remove Label” message appears when the label size used does not match the label size that is set up in your DLP-300 or Label Peel Sensor value changed. In this case, the label size and/or sensor setting needs to be adjusted on the scale. Or if the label roll is installed incorrectly, then you can get the message “Please Remove La”. Please check your label to see if the label is installed correctly. Please do not thread the label paper between the front bars and/or make sure not to slide the label roll under the white plastic roller.
1. If your label roll is installed correctly, you need to check the printer sensor value.
2. Press and hold the [ZERO] key. At the same time, press “1” - “1” - “3”.
3. You will see "GAP Sensor Val" on the information display.
4. Press the [PRINT] key 2 times (you will see P02 on TARE display)
5. You should see “40” on P02 if set up correctly.
If you see “20” or any other number, you need to change it by pressing [PRINT] - "4" - "0" - [PRINT]-[SAVE]
6. Another issue could be that the Start Position is too high compared to your label size.
7. So please reduce the start position.
8. Press and hold the [ZERO] key. At the same time, press “1” - “1” - “3”.
9. You will see "GAP Sensor Val" on the information display.
10. Press the [X] key 2 times(for P03 on TARE display and “start Position” on the information.).
You can see the start position value which is 115 on UNIT PRICE display. Please reduce 40 from 115 which is 75.
11. Press [PRINT] - "7" - "5" - [PRINT] (for P03.1 on TARE display)
12. Press the [SAVE] key. Press the [FEED] key.
13. Call a PLU and print a label for test.
14. As you can see, we resolved the error message, "Please Remove La".
15. If you still have “Please Remove La” message, then we can try disabling the GAP sensor.
16. Press and hold the [ZERO] key. At the same time, press “1” - “1” - “3”.
17. You will see "GAP Sensor Val" on the information display.
18. Press the [X] key 4 times (for P05 on TARE display and “Enable RMO” on the information.)
19. Press [PRINT] – “0” – [PRINT] – [SAVE] – [FEED].
20. Call a PLU and print a label for test.
#18 How to print labels without the PLU data?
1. By weight. For example, if the desired unit price is $1.99 per LB
a. Place the item and press the [MISC WEIGHT] key.
b. Press 1 – 9 – 9 for the desired unit price
c. Press the [PRINT] key
2. By non-weight: If the desired unit price is $1.50 per piece and you want to sell 2 pcs.
a. Press the [MISC NON WEIGHT] key
b. Press 2 for the desired quantity
c. Press the [FOR] key and press 1 – 5 – 0 for the desired unit price
d. Press the [PRINT] key
3. By item count: If the set unit price is $5.00 per 2pcs but you need to sell 3pcs.
a. Press the [MISC BY COUNT] key
b. Press 3 for the desired total quantity.
c. Press the [FOR] key and press 2 for the set unit quantity.
d. Press the [FOR] key and press 5 – 0 – 0 for set unit price per 2 pcs
e. Press the [PRINT] key
Please see the video. https://www.youtube.com/watch?v=hrygvENlxYA&t=33s
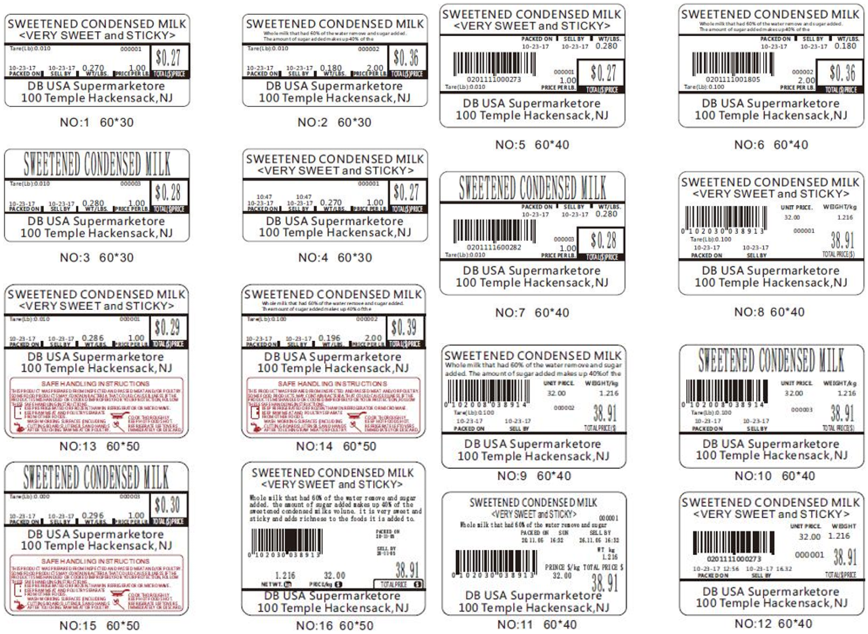
#19 How to add a image or "Safe Handling Instruction" on label
Please watch the video. https://www.youtube.com/watch?v=pzpXsayQZxY
Today, I will show you how to add an image on the DLP-300 scale label using XDB Manager software.
First of all, your DLP-300 scale should be connected to XDB Manager software.
1. Open the XDB Manager.
2. Click [Config] and click [SPEC].
3. Find and click [LOGO] at the top.
4. Click [LOGO01] and click [Load].
5. Select the image that you want to add on the label. I will add the Safe handling instruction image on the label.
Please remember the file format of the image must be BMP and the size of image must be less than 10kBite.
6. Click download - select the scale # - then ok.
Once you see the 100% green bar in the Progress Bar, the image has properly downloaded.
7. Apply and save the Config window.
8. Open [LabelDesigner]
9. Open your label file or create new label for you.
10. "CLICK AND DRAG" LOGO1 from the left side menu.
11. Change values to the following.
X : 16 , Y : It's up to you.(272) , W : 439 , H : 158
12. Enter “1” as "LOGONO". This # is the logo # that you downloaded in your DLP-300 scale from steps #1~6.
13. Click Download the label format. Select the scale #. Click OK.
14. Once you see the 100% green bar in the Progress Bar, the label format has properly downloaded.
15. Test your changes by printing
#20 For first user : Shopname, Create PLU and Speedkey.
Please watch the video for first user. https://www.youtube.com/watch?v=2-FaWmbJ1j8&t=6s
** Set up the store information **
1. Press the "MODE" key twice and press the “AUTO” key..
2. Press the "PRINT" key and enter the shop number. And press the "PRINT" key.
3. Enter the first line of your desired shop information, which can be your store name.
You can clear the existing information by pressing the "C" key.
4. Press the "X" key to go to the next line. Enter the desired information for the second line.
For example, you can add either your phone number or address.
If you want to add more information, you can press the "X" key to add more lines. But normally the label format is only for two lines.
5. Press the "PRINT" key and then the "SAVE" key
6. Press the “FEED” Key.
7. The store name will be printed on the label from “2nd Label”, not 1st label.
** Create PLU : By Weight / By Count **
1. Press the "MODE" key twice and the "PRINT" key once.
2. Enter the PLU number you wish to create or edit and press the "PRINT" key.
3. Enter the PLU name (ex. RIB EYE) and press the "PRINT" key.
4. Enter the desired unit price and press the "PRINT" key.
5. Enter the PLU Type and press the "PRINT" key. * No. 0 (Weight) | No. 1 (Non-weight) | No. 2 (By count)
6. Enter the item code and press the "PRINT" key.
7. Enter the sell by date and press the "PRINT" key.
8. Enter the tare weight (if you want) and press the "PRINT" key. We pressed “2” which indicates 0.02 LB
9. Enter the qty and press the "PRINT" key. In this case, we are creating a by Weight PLU so, we put “0” as the quantity.
10. Enter the Ingredient message and press the "PRINT" key.
11. You can choose to print the “SELL BY DATE” or not. Press 1 : Print or Press 0 : Not Print
12. You can choose to print the “PACKED ON DATE” or not. Press 1 : Print or Press 0 : Not Print
13. Press “SAVE”. It’s very important to press the SAVE key every time after creating a PLU.
14. Press the “FEED” key.
** Set up Speed key **
1. Press the MODE key twice.
2. Press the X key five times then press PRINT
3. Enter the PLU number you want to assign to the #1 key.
4. Print and you can enter the PLU number you want to assign to #2 key.
5. Press SAVE then FEED.
#21 How to set it up as KG (KG calibration)
1. First turn on the DLP-300
2. Press and hold the [ZERO] key while pressing “1”+”0”+”1”+”3”.
3. Press and hold the [ZERO] key while pressing “1”+”4”+”2”.
4. Press “7”+”0”+”8” and press [X] key. And press “1” – [PRINT] key.
5. Press “7”+”3”+”5” and press [X] key. And press “0” – [PRINT] key.
6. Press “7”+”3”+”9” and press [X] key. And press “2” – [PRINT] key.
7. Press “7”+”4”+”1” and press [X] key. And press “3” – [PRINT] key.
8. Press [SAVE] key.
9. Then turn off the scale
10. Flip the scale and you will find the CAL switch cover on the bottom back side. Remove the CAL switch cover.
11. Turn on the scale and you will hear a BEEP sound.
Once you see “Booting....” on the information display, press and hold the CAL switch until you hear a short BEEP sound.
12. Wait until the screen displays all 000 and the time. Then press and hold [ZERO] key while pressing “9”+”8”+”1”+”1”.
13. Make sure that you can see “Demarcate” in the Information display. If you don’t see this, please go back through steps 1-12.
14. Press the [PRINT] key twice. You will see “SP” and “30.000” on the Total Price display.
15. Load a 30 kg weight then press the [PRINT] key.
16. The Weight Display should read 30.00. Remove the weight to make sure the weight goes down to 0.00.
Then place the weight back on to confirm that the scale is reading the weight properly.
#22 How to use AUTO, SAVE, PREPACK mode
Please watch the video. https://www.youtube.com/watch?v=NY-f_ivZLQI
[AUTO mode]
: Enable to print a label automatically for a By Weight PLU after placing a weight on the scale without having to press the “PRINT” key.
This does not work for the Non Weight PLU or By Count PLU.
1. Press the AUTO key. (The tri-mark(▼) above AUTO on the display filter should be illuminated.)
2. Recall a By Weight PLU and place an item on the platter.
3. The label comes out automatically.
4. To cancel the AUTO mode, press the AUTO key.
[SAVE mode ]
: Enable to remain PLU information after printing a label
1. Press the SAVE key. (The tri-mark(▼) above SAVE on the display filter should be illuminated.)
2. Recall a PLU. If it is a By Weight PLU, then place an item on the tray.
3. Press the PRINT key.
4. Even if you remove the item from the platter, the PLU information remains on the display.
5. To clear the PLU information press the blue C key.
6. To cancel the SAVE mode, press the SAVE key.
[PREPACK mode]
: Combination of AUTO and SAVE options. With the By Weight PLU, labels will print automatically once the weight is placed on the scale and stabilized, without pressing the “PRINT” key and when you print a label and remove the weight, the PLU information remains.
This option does not work for the Non Weight PLU and By Count PLU modes.
1. Press the PREPACK key. (The tri-mark(▼) above PREPACK on the display filter should be illuminated.)
2. Recall a By Weight PLU and place an item on the tray.
3. The label comes out automatically.
4. Even if you remove the item from the tray, the PLU information remains on the display.
5. You can put another item on the tray and the label comes out automatically.
6. To clear the PLU information, press the blue C key.
7. To cancel the PREPACK mode, press the PREPACK key.
#23 Temporary Price Change (By Weight PLU / Non Weight PLU / By Count PLU)
Please watch the video about Temporary Price Change. https://www.youtube.com/watch?v=Wfa-t0eHUl0
[By Weight PLU]
1. Recall a By Weight PLU.
2. Press the [OVERRIDE] key. (If prompted, enter the password.)
3. Enter the new Unit Price. Place commodity on the platter.
4. Press the [PRINT] key.
[Non Weight PLU]
1. Recall a Non-Weight PLU.
2. Press the [OVERRIDE] key. (If prompted, enter the password)
3. Enter the new Unit Price then press the [PRINT] key. If you want to change the quantity, too, then press the [FOR] key.
4. Enter the Quantity and press the [PRINT] key.
[By Count PLU]
1. Recall a By Count PLU.
2. Press the [OVERRIDE] key. (If prompted, enter the password)
3. Enter the new Unit Price and press the [FOR] key.
4. Enter the Quantity that is being purchased then press the [FOR] key.
5. Enter the Quantity the item is priced by and press the [PRINT] key.
#24 TARE Override/Printing Multiple Labels/PLU Type Change (By weight to By Count mode)
Please watch the video. https://www.youtube.com/watch?v=1-h_ZU6I5ZQ
[TARE Override]
1. To override a Tare Weight already programmed in a PLU, recall the PLU.
2. Place the container on the platter and press the TARE key.
3. Place commodity on the tray and press PRINT key.
[Manual TARE and Weighed TARE for MISC Item]
1. To enter a Tare weight manually, make sure there are no PLU’s recalled (scale is at all zeroes).
2. Enter the weight using the number keys and then press the TARE key.
3. Press the MISC WEIGHT key and enter the unit price.
4. Place commodity on the tray and press PRINT key.
5. To enter the Tare weight of a container, make sure there are no PLU’s recalled (scale is at all zeroes).
6. Place the container on the tray and press the TARE key.
7. Press the MISC WEIGHT key and enter the unit price.
8. Place commodity on the tray and press PRINT key.
[Printing Multiple Labels]
1. Recall the desired PLU and press the PRESET COUNT key.
2. Enter the desired number of labels to print and press the PRINT key.
3. Labels will be issued.
[PLU Type Change : By weight to By Count]
1. Recall the desired By Weight PLU and press the FOR key.
2. The PLU is now a By Count PLU. If you want, you can change the quantity or/and the unit price by pressing the FOR key.
3. Enter the quantity for purchase and press the FOR key.
4. Enter the quantity the item is priced by and press the FOR key.
5. Enter the unit price and press the PRINT key.
#25 How to print all PLU data
Please watch the video about print all PLU data. https://www.youtube.com/watch?v=LThSLuUoHqU
1. Press the [MODE] – [PRINT] key.
2. You will see “Min PLUNO Value” on the INFORMATION display.
3. If you want to print label for PLU#1 to PLU#10, then Press “1” – [PRINT] key.
4. Press “10” – [PRINT] key.
5. Press the [SAVE] key.
6. DLP-300 will print the labels from PLU#1 to PLU#10.
#26 How to connect DLP-300 to XDB manager software with "WIRED" network
Please watch the video. https://www.youtube.com/watch?v=DpP5Sgyw-P4
Set up the scale.
1. Plug a RJ45 cable(:Ethernet cable) from the scale to the router.
2. Press and hold the [ZERO] key and press “1”+”1”+”2”
3. Press the [PRINT] key, press “1” and press [PRINT] key. This number is the scale number.
4, Press the [X] key. You will see “H03”on the TARE display and “Ethernet IP” on the Information display.
5. Press the [PRINT] key then press “192”+”168”+”1”+”51” then [PRINT].
(This is the number you want to set as your scale IP address)
6. You will see “H04” on the TARE display. Press the [PRINT] key 5 times to confirm that the number is correct. (255.255.255.0)
7. You will see “H05” on the TARE display. Press the [PRINT] key 5 times to confirm that the number is correct. (192.168.1.1)
8. You will see “H06” on the TARE display. Press the [PRINT] key 5 times to confirm that the number is correct. (192.168.1.1)
9. Press the [SAVE] key.
10. If you have more scales, please follow the same steps above.
Remember, the scale IP address (#4) should not be same for each scale.
Connecting the DLP-300 scale with XDB manager software
1. Plug a RJ45 cable(:Ethernet cable) from the PC to the router
2. Set up or find your PC IP address. Go to Network – Change adapter options.
And go to properties. Click TCP/IPv4 – Properties. Then you can change or see your PC IP address. (Ours is 192.168.1.50)
3. Open the XDB Manager software.
4. In the section [Dept-Mg-Scale], right click and select [Add DEPT].
5. Fill out the Dept No. and Dept name. And press [Save] then [Close].
6. Right click on the Department. And select [Add MainGroup].
7. Fill out [MG NO.] and [MainGroup Name]. Select the Department. And press [Save] then [Close].
8. Click the Department "DB MART" and right click on "MEAT" and select [Add Scale].
9. Fill out the [ScaleNo] and the [IP Address] for the scale IP address.
We put NO.1 and “192.168.1.51” for the scale IP address. And press [Save] then [Close].
10. Click the Department "DB MART" and right click on "MEAT" and select [Add Scale].
11. Fill out the [ScaleNo] and the [IP Address] for the scale IP address.
We put NO.2 and “192.168.1.52” for the scale IP address. And press [Save] then [Close].
12. Go to the XDB Manager. Click “TCP/IP” on the top menu bar and click “NetworkDetect”.
Then under “Scale List”, select all scales that you want to check the connection. Then click [OK].
Once you see the 100% green bar for “Network Test” in the Progress Bar on the right, then your DLP-300 scale is connected correctly to your PC.
13. Search “CMD”(or “Command Prompt”) on your PC to run Command Prompt. Enter “ping 192.168.1.51” And press ENTER.
If you get a reply, then your DLP-300 scale is connected correctly to your PC.
If you want to check another scale, then repeat step #13.
14. You just finished adding a scale to the XDB manager software.
Now, I will show you how to add a PLU to the XDB manager.
Enter the PLU #, Item Code, Name, Unit Price, and press the [SAVE] key. You can add some Ingredients as well.
15. Let’s try to download PLU data for testing. Click “TCP/IP” on the top menu bar of the XDB manager.
16. Click “Download All PLU” and click the scale #. Then click [OK].
17. Once you see the 100% green bar in the Progress Bar on the right, the PLU data has properly downloaded.
You will be able to recall PLU data from your scale.
#27 How to fix "Check Min Wt."
Please watch the video about "Check Min Wt." https://www.youtube.com/watch?v=x66jqz_vVoE
1. Press and Hold [ZERO] key and same time press "1"-"0"-"1"-"3"
2. Press and Hold [ZERO] key and same time press "1"-"4"-"2"
3. You will see "SP501" on WT display.
4. Press "5"-"1"-"2" and press [X] key.
5. You will see "Min d Printing W" on information display.
6. Press "1" and press [PRINT] key.
7. Press [SAVE] key.
8. Press [C] key.
#28 How to copy DATA from one DLP-300 scale to another DLP-300 scale
Please watch the video. https://www.youtube.com/watch?v=ZNfmqRp5LYU
1. Connect the USB drive to the scale ①. The USB drive should be formatted to be a FAT type, not NTFS type.
2. You will see the [▼] over the [USB] on the display.
3. Press the [MODE] key three times and press the [OVERRIDE] key four times.
4. You will see “Z13” “Backup” on the display and press the [PRINT] key.
5. Press “1” and the [PRINT] key to download all settings.
6. Press “1” and the [PRINT] key to download the Network setting.
7. Press “1” and the [PRINT] key to download all Label Format.
8. Press “1” and the [PRINT] key to download UDF BCD Format(User Defined Barcode Format).
9. Press “1” and the [PRINT] key to download the Main db(database).
10. Press [SAVE] to Back up.
11. Connect the USB drive to the scale ②.
12. Press the [MODE] key three times and press [OVERRIDE] key three times.
13. You will see “Restore” on display and press the [PRINT] key.
14. Press “1” and the [PRINT] key to restore all settings.
15. Press “1” and the [PRINT] key to restore the Network setting.
16. Press “1” and the [PRINT] key to restore all Label Formats.
17. Press “1” and the [PRINT] key to restore the UDF BCD Format(User Defined Barcode Format).
18. Press “1” and the [PRINT] key to restore the Main db(database).
19. Press [SAVE] to restore and press the [FEED] key.
20. Now you can see that the data has been copied.
(PLU, Network setting and so)
If you want to copy only PLU data,
1. Press the [MODE] key three times and press the [OVERRIDE] key two times.
2. You will see “Z15” “Save PLU to USB” on the display and then press the [PRINT] key.
3. Press “1” and press the [SAVE] key.
4. Connect the USB drive to the scale ②.
5. Press the [MODE] key three times and press the [OVERRIDE] key.
6. You will see “Z16” “Load PLU from USB” on the display.
7. Press “1” and press the [SAVE] key.
8. Now you can see all PLU data on the scale ②.
#29 How to print or not print PACKED ON DATE and/or SELL BY DATE on the label
Please watch the video. https://www.youtube.com/watch?v=aJ4908wDIW4
If you don’t want to print “PACKED ON DATE / SELL BY DATE” on the label, please follow these instructions.
First, use the shortcuts key for all PLUs.
1. Press the shortcut key # ①. The “PACKED ON DATE” will be printed on the label.
2. Press the shortcut key # ②. The “SELL BY DATE” will be printed on the label.
3. If press the key # ① again, the “PACKED ON DATE” will not be printed on the label.
4. If press the key # ② again, the “SELL BY DATE” will not be printed on the label.
5. These shortcuts are only possible if the scale version is greater than V1.0.3.0. To check the version of your scale, press “1” - “4” - “5”.
Secondly, change the setting by PLU.
1. If you want to print the “PACKED ON DATE” and the “SELL BY DATE” of PLU #1, press the [MODE] key twice.
2. Press [PRINT] - “1 (;PLU#)” and then press the [PRINT] key again.
3. Press the [PRINT] key 7 times to find “Print Pack Date” and “Prt Sell By Date” and then press “1” for printing or “0” for not printing. Then press the [PRINT] - [SAVE] key.
4. If you can’t see “Print Pack Date” and “Prt Sell By Date” while pressing the [PRINT] key,
press the [FEED/ESC] key and then press the [OVERRIDE] key. You will see “PLU Fields Visibility” on the display.
5. Press the [PRINT] key, press the [OVERRIDE] key 6 times. You will see “Print Pack Date” on the display.
6. Press “1” for printing or “0” for not printing. And then press the [PRINT] key.
7. Press the [OVERRIDE] key 4 times. You will see “Prt Sell By Date” on the display.
8. Press “1” for printing or “0” for not printing. And then press the [PRINT]
9. Press the [SAVE] - [FEED/ESC] key.
#30 How to import PLU data from Excel to XDB Manager
Please watch the video. https://www.youtube.com/watch?time_continue=4&v=cgx0MuuxcN8&feature=emb_title
1. Go to www.Visiontechshop.com and find DLP-300 scale from the BEST Selling models.
2. Scroll down and Click the Download tab under product image.
3. Click “Template DLP-300 PLU CSV File“ to download the template of PLU data.
4. Open Template DLP-300 PLU CSV File.CSV.
5. Enter your PLU data.
6. Item code is for barcode on the label. You must enter the item code. Otherwise, the barcode will not be printed on the label.
7. If you want to print “SELL BY DATE” on the label, please enter “1” on “Print Sell By Date” column. If NOT, enter “0”.
8. If you want to print “PACKED DATE” on the label, please enter “1” on “Print Pack Date” column. If NOT, enter “0”.
9. [Important!] You must save the file as “CSV” file, not “XLS” file.
10. Open the XDB Manager program.
11. Click [PLU] and Click [PLUImportConfig] on the top.
12. Click “Open” and change the file type to “CSV Text File(*.CSV)”. Select and open “Template DLP-300 PLU CSV File.csv”.
13. Match the Import Field and Index with CSV File.
14. Main Group No is 1st column. So, click “Enable” on MainGrpNo and enter “0” on “Index”
15. PLU No is 2nd column. So, click “Enable” on PLUNO and enter “1” on “Index”
16. PLU Name is 3rd column. So, click “Enable” on Name and enter “2” on “Index”
17. PLU type is 4th column. So, click “Enable” on PLU Type and enter “3” on “Index”
18. Do same way with other field. If CSV file doesn’t have the information, then uncheck “Enable” and enter “-1” on “Index”.
19. Click [Apply] and [Save].
20. Click [Import PLU] and click “Yes”.
21. After import all PLU data, click “OK”.
#1 How to Adjust Label Feed DLP-300
Please see the video about label feed adjustment. https://youtu.be/LeaeuKRDc8s
#2 How to Change Label Format ? DLP-300
#4 How to Create Speed Keys
Please see the video about creat Speed Keys. https://www.youtube.com/watch?v=xfCMC10eOBQ
#5 How to show/hide PLU menu categories
Please see the video about show/side PLU menu categories. https://www.youtube.com/watch?v=uYuwN9Sfj5A
#6 How to Install XDB Manager
2. Click on Download tab under product image.
3. Click on "XDB Manager Software" link.
4. Download link is also provided in description to our youtube video.
5. Extract downloaded file to directory of your choice.
6. Right click "XDBManager" file.
7. Select "Create shortcut" on menu.
8. Cut & Paste shortcut to desktop.
9. Click on "More info" on windows warning.
10. Click "Run anyway"
Please see the video about Install XDB Manager. https://www.youtube.com/watch?v=NXq3KQRLG9k
#7 How to Create a New PLU Code
2. Enter the PLU unmber you wish to create and press the "PRINT" key.
3. Enter the PLU name (ex. RIB EYE) and press "PRINT" key.
4. Enter the unit price and press the "PRINT" key.
5. Enter the PLU Type and press the "PRINT" key.
* No. 0 (Weight) | No. 1 (Non-weight) | No. 2 (By count)
6. Enter the Item code and press the "PRINT" key.
7. Enter the sell by date and press "PRINT" key.
8. Enter the sell by time and press "PRINT" key.
9. Enter the tare weight (if you want) and press "PRINT" key.
10. Enter the qty and press the "PRINT" key.
11. Enter the Ingredient message and press the "PRINT" key.
** Number 0 means not to print | Number 1 means to print
12. Enter the print sell by date status (0: No, do not print | 1: Yes print) and press "PRINT" key.
13. Enter the print sell by time status (0: No, do not print | 1: Yes print) and press "PRINT" key.
14. Enter the print cook by time status (0: No, do not print | 1: Yes print) and press "PRINT" key.
15. Enter the print pake date status (0: No, do not print | 1: Yes print) and press "PRINT" key.
And enter the discount status(0 or 1) and press the "PRINT" key.
If you get back to PLU NO section, you are done to make a PLU code.
Press "FEED" key twice to see if you make a code well.
Enter the PLU unmber you just cerated and press "PLU" key. And press "PRINT" key.
Please see the video about create a New PLU Code. https://www.youtube.com/watch?v=_Gizpf0o04c
#8 How to enter The Store Information
1. Press "MODE" key twice and press "X" key.
2. Press "PRINT" key and enter shop number. And press "PRINT" key.
3. Enter the first line of shop information. Which is store name.
You can clear the existing information by pressing the "C" key.
4. Type your store name.
5. Press "X" key to go to the next line.
Enter the second line information. It can be either phone numbers or address.
If you want to add more information, you can press "X" key to add more lines.
6. To finish, press the "PRINT" key and then "SAVE" key.
Please see the video about enter the store information. https://www.youtube.com/watch?v=jko0BeXwB4U
#9 How to wirelessly connect the scale with the XDB Manager (New Version → #37)
Please see the video about wirelessly connect the scale with XDB Manager.https://www.youtube.com/watch?v=PNNzhwGWfWI
Setting up a WIFI network on the DLP-300 scale.
1. Press and hold the [ZERO] key and press “1”+”1”+”2”
2. Press the [PRINT] key, press “1” and press the [PRINT] Key.
3. Press [x] key 9 times. You will see “H11” on the TARE display and “WIFI IP” on the INFORMATION display.
4. Press the [PRINT] key then press “192”. Press [PRINT] then “168”. Press [PRINT] then “43”. Press [PRINT] then “21” then [PRINT]. (This is the number you set as your Scale IP address on the computer from the previous section)
5. Press the [PRINT] key 5 times. You will see “H13” on the TARE display and “WIFI Gateway” on the INFORMATION display.
6. Press the [PRINT] key then press “192”. Press [PRINT] then “168”. Press [PRINT] then “43”. Press [PRINT] then “1” then [PRINT]. (This number is only for our network. You might have a different #).
7. Press the [PRINT] key then press “192”. Press [PRINT] then “168”. Press [PRINT] then “43”. Press [PRINT] then “1” then [PRINT]. (This number is only for our network. You might have a different #).
8. Now, you will see “H15” on the TARE display and “SSID” on the INFORMATION display.
9. Press the [BROWSE] key. Press the [OVER RIDE] key until you find your WIFI SSID then press the [PRINT] key.
10. Press the [PRINT] key 3 times.
11. Enter the WIFI password and press the [PRINT] key.
12. Press the [PRINT] key 2 times and press [SAVE].
Connecting the DLP-300 scale with XDB manager software
1. First of all, if you want to find your PC IP address and DNS Servers IP address, go to “Internet Access” - "Properties". You will see your PC IP address, DNS Servers IP address, WIFI SSID, and etc.
2. Open XDB Manager software.
3. In section [Dept-Mg-Scale], right click and select [Add DEPT].
4. Fill out the Dept No. and Dept name. And press [Save] and [Close].
5. Right click on the Department. And select [Add MainGroup]
6. Fill out [MG NO.] and [MainGroup Name]. Select the Department. And press [Save] and [Close].
7. Click the Department. "DB MART" and right click on "Vegetable"and select [Add Scale].
8. Fill out [ScaleNo], [IP Address] for scale IP address. We put 192.168.43.21 for scale IP address. And press the [Save] and [Close].
9. Search “CMD”(or “Command Prompt”) on your PC to run Command Prompt. Enter “ping 192.168.43.21” which is your DLP-300 scale IP address. And press ENTER. If you get a reply, then your DLP-300 scale is connected correctly to your WIFI network.
10. You just finished adding a scale to the XDB manager software. Now, I will show you how to add a PLU to the XDB manager. Enter the PLU #, Item Code, Name, Unit Price, and press the [SAVE] key. You can add some Ingredients as well.
11. Let’s try to download PLU data for testing. Click “TCP/IP” on the top menu bar of the XDB manager.
12. Click “Download All PLU” and click the scale #. Then click [OK].
13. Once you see the 100% green bar in the Progress Bar, the PLU data has properly downloaded. You will be able to call PLU data from your scale.
#10 How to connect "Directly" a DLP-300 scale to XDB Manager.
Please see the video connect directly a DLP-300 to XDB Manager with RJ45 Cable.
https://www.youtube.com/watch?v=qvktR98osB0
How to connect directly a DLP-300 to XDB Manager with RJ45 Cable.
There are two ways to connect your DLP-300 scale with XDB manager by wired network.
1. DLP-300 directly connect to XDB manger
2. DLP-300 connect to XDB manger via your network.
I will explain how to connect (1) DLP-300 directly connect to XDB manger on this video.
1. Plug a RJ45 cable (: Ethernet cable) from PC to DLP-300 directly.
2. Set up or see your PC IP address. Go to Network – Change adapter options.
And go to the properties. Click TCP/IPv4 – Properties. Then you can see your PC IP address.
(Our is 192.168.1.50)
3. Press and hold the [ZERO] key and press “1” +”1” +”2. If you want to set the scale # as #1, then
4. Press the [PRINT] Key, press “1” and press the [PRINT] Key.
5. Press [x] key. You will see “H03” on the TARE display and “Ethernet IP” on the INFORMATION display.
6. Press the [PRINT] key then press “192”. Press [PRINT] then “168”. Press [PRINT] then “1”. Press [PRINT] then “51” then [PRINT]. (This is the number you want to set as your Scale IP address)
7. Press [SAVE] key.
Connecting the DLP-300 scale with XDB manager software.
1. Open XDB Manager software.
2. In section [Dept-Mg-Scale], right click and select [Add DEPT].
3. Fill out the Dept No. and Dept name. And press [Save] and [Close].
4. Right click on the Department. And select [Add MainGroup]
5. Fill out [MG NO.] and [MainGroup Name]. Select the Department. And press [Save] and [Close].
6. Click the Department. "DB MART" and right click on "MEAT" and select [Add Scale].
7. Fill out [ScaleNo], [IP Address] for scale IP address. We put 192.168.1.51 for scale IP address. And press the [Save] and [Close].
8. Search “CMD”(or “Command Prompt”) on your PC to run Command Prompt. Enter “ping 192.168.1.51” which is your DLP-300 scale IP address. And press ENTER. If you get a reply, then your DLP-300 scale is connected correctly to your PC
9. You just finished adding a scale to the XDB manager software. Now, I will show you how to add a PLU to the XDB manager. Enter the PLU #, Item Code, Name, Unit Price, and press the [SAVE] key. You can add some Ingredients as well.
10. Let’s try to download PLU data for testing. Click “TCP/IP” on the top menu bar of the XDB manager.
11. Click “Download All PLU” and click the scale #. Then click [OK].
12. Once you see the 100% green bar in the Progress Bar, the PLU data has properly downloaded. You will be able to call PLU data from your scale.
Now, I will show you how to download store name to the DLP-300 from XDB Manager.
1. Click Config on top mane and click Shop TextConfig.
2. Click ShopName01 and put store information on Content.
We put our company information “DB MART 201.123.4567” “100 TEMPLE AVE, HACKENSACK, NJ 07601”
And Click Download.
3. Click scale # - ok. Once you see the 100% green bar in the Progress Bar, the store name has properly downloaded.
4. Click [Apply] and [SAVE]
#11 How to print labels with the backing paper on
Please see the video about print labels with backing paper on. https://www.youtube.com/watch?v=60lAvdDDUew
1.
Please take out the cartridge from the scale and cut the label nicely. And please put the cartridge back.
2. You will see the message “Press Feed key” or “Please Remove La”. This is fine. Go to the next step as is.
There are two ways to set up printing labels with backing paper.
The first way is the following :
1. Press the [ZERO] key and press “1”-”4”-”1”
2. Press “5”-“3” then the [X] key. You will see “Enable ROM” on the INFORMATION display.
3. Press “0” which will disable the peel off sensor. And press [PRINT] then [SAVE].
4. Press the [FEED] key and call a PLU. Let’s call PLU #2 and print 5 labels.
Then, press “2” - [PLU] - [Pre Set Count] - “5” - [PRINT] – [FEED].
The second way is the following :
1. Press the [ZERO] key and press “1”-”1”-”3”
2. Press the [X] key 4 times. You will see “P05” on the TARE display and “Enable ROM” on the INFORMATION display.
3. Press [PRINT] and press “0” which will disable the peel off sensor. And press [PRINT].
4. You will see “P06” on the TARE display and press [SAVE].
5. Press the [FEED] key and call a PLU. Let’s call PLU #2 and print 5 labels.
Then, press “2” - [PLU] - [Pre Set Count] - “5” - [PRINT] – [FEED].
#12 Print a label with the total price exceeds $100.00
Please watch the video. https://www.youtube.com/watch?v=kSn2Um_PLlo
The main issue here is usually that the total price of the item exceeds $100.00 and the barcode format must be changed to reflect the increase in price digits from 4 to 5. Please follow the instructions below:
Press and hold the "ZERO" key while pressing “1” + “4” + “1”. You will see "BCD.FMT/F1/F2" on the information display.
Press [X] 3 times and you will see “SP004” in the WEIGHT section.
Press the [X] key again, which should change the WEIGHT display to "SP005", to set up By Weight PLU's barcode. The UNIT PRICE display will read a number - usually 23 in this case. Press "21" or "0" depending on the desired barcode format in the list below (“21” has the check sum digit between the PLU # and total price). Then press the "PRINT * ENTER" key.
To set up Non Weight PLU's barcode, press the desired # ("21" or "0") and press "ENTER".
To set up By Count PLU's barcode, press the desired # and press "ENTER".
Press the "SAVE" key to save.
Barcode Format # List (D : Department / P : PLU # / $ : Total Price / W : Weight / C : Check sum)
0. DDPPPPP$$$$$C (EAN13)
21. DDPPPPC$$$$$C
23. DDPPPPPC$$$$C
#13 How to fix the "Amount Overflow" error?
The main issue here is usually that the total price of the item exceeds $100.00 and the barcode format must be changed to reflect the increase in price digits from 4 to 5. Please follow the instructions below:
Press and hold the "ZERO" key while pressing “1” + “4” + “1”. You will see "BCD.FMT/F1/F2" on the information display.
Press [X] 3 times and you will see “SP004” in the WEIGHT section.
Press the [X] key again, which should change the WEIGHT display to "SP005", to set up By Weight PLU's barcode. The UNIT PRICE display will read a number - usually 23 in this case. Press "21" or "0" depending on the desired barcode format in the list below (“21” has the check sum digit between the PLU # and total price). Then press the "PRINT * ENTER" key.
To set up Non Weight PLU's barcode, press the desired # ("21" or "0") and press "ENTER".
To set up By Count PLU's barcode, press the desired # and press "ENTER".
Press the "SAVE" key to save.
Barcode Format # List (D : Department / P : PLU # / $ : Total Price / W : Weight / C : Check sum)
0. DDPPPPP$$$$$C (EAN13)
21. DDPPPPC$$$$$C
23. DDPPPPPC$$$$C
Please watch the video for "Amount Overflow" error. https://www.youtube.com/watch?v=kSn2Um_PLlo
#14 How to Change Label Roll
Please see the video about change Label Roll. https://www.youtube.com/watch?v=o7pNC-QRPLU
1. Open the side door.
2. Turn the print head lever clockwise and remove the cassette.
When pulling out the cassette, it helps to use both hands and apply a downward pressure while removing it.
3. Remove both the backing paper holder clip and label roll holder.
4. Take off 4 to 5 stickers and place roll of labels on the label roll spool.
5. Take the end of the label roll and place it between the black sensor plate then thread the paper over the front metal bars.
Please do not thread the label paper between the front bars.
Threading the label paper between the bars will produce an error.
6. Pull out enough paper to go over the white plastic roller and under and around the black backing paper spool.
Make sure not to slide the label roll under the white plastic roller.
Place the clip holder to secure the label backing paper.
7. Place the label roll holder on the label roll spool and rotate it 15 degrees clockwise.
8. Adjust the white label paper guide to fix the label into the right position.
9. Install the cassette with labels into the scale.
10. Turn the print head lever counterclockwise to lock it. Then close the side door.
11. Press the [FEED] key a few times so the scale can recognize the size of the label.
There is also a brief installation guide on the side door that you can use as a reference
If you get the label, you are all set.
There is also a brief installation guide on the side door.
#15 How to change the department # of barcode? DLP-300
Press and hold [ZERO] key and press “1” + “4” + “1”. You can see "BCD.FMT/F1/F2" on the display.
Press [PRINT] key. Press “9” + “9”.
Press [PRINT] key and press [SAVE] key to save and exit.
Please see the video about change the department # of barcode. https://www.youtube.com/watch?v=gmw8RUERp2M
#16 How to change LABEL BARCODE FORMAT?
Press and hold [ZERO] key while pressing “1” + “4” + “1”. You can see "BCD.FMT/F1/F2" on the display.
Press [X] 3 times. You can see “SP004” in the WEIGHT section on the display.
Press the [X] key again, which should change the WEIGHT display to “SP005” to set up By Weight PLU.
Select the desired # from the Barcode Format # List below and press [PRINT] key.
Press [X] 1 more time to set up Non weigh PLU. Select type # and press [PRINT] key.
Press [X] 1 more time to set up By count PLU. Select type # and press [PRINT] key.
Press [SAVE] key to save.
Please see the video about change label barcode format. https://www.youtube.com/watch?v=kSn2Um_PLlo&t=3s
#17 How to solve "Please Remove La" message
Please watch the video about "Please Remove La" message. https://www.youtube.com/watch?v=Ga6cg_ElPwQ
The “Please Remove Label” message appears when the label size used does not match the label size that is set up in your DLP-300 or Label Peel Sensor value changed. In this case, the label size and/or sensor setting needs to be adjusted on the scale. Or if the label roll is installed incorrectly, then you can get the message “Please Remove La”. Please check your label to see if the label is installed correctly. Please do not thread the label paper between the front bars and/or make sure not to slide the label roll under the white plastic roller.
1. If your label roll is installed correctly, you need to check the printer sensor value.
2. Press and hold the [ZERO] key. At the same time, press “1” - “1” - “3”.
3. You will see "GAP Sensor Val" on the information display.
4. Press the [PRINT] key 2 times (you will see P02 on TARE display)
5. You should see “40” on P02 if set up correctly.
If you see “20” or any other number, you need to change it by pressing [PRINT] - "4" - "0" - [PRINT]-[SAVE]
6. Another issue could be that the Start Position is too high compared to your label size.
7. So please reduce the start position.
8. Press and hold the [ZERO] key. At the same time, press “1” - “1” - “3”.
9. You will see "GAP Sensor Val" on the information display.
10. Press the [X] key 2 times(for P03 on TARE display and “start Position” on the information.).
You can see the start position value which is 115 on UNIT PRICE display. Please reduce 40 from 115 which is 75.
11. Press [PRINT] - "7" - "5" - [PRINT] (for P03.1 on TARE display)
12. Press the [SAVE] key. Press the [FEED] key.
13. Call a PLU and print a label for test.
14. As you can see, we resolved the error message, "Please Remove La".
15. If you still have “Please Remove La” message, then we can try disabling the GAP sensor.
16. Press and hold the [ZERO] key. At the same time, press “1” - “1” - “3”.
17. You will see "GAP Sensor Val" on the information display.
18. Press the [X] key 4 times (for P05 on TARE display and “Enable RMO” on the information.)
19. Press [PRINT] – “0” – [PRINT] – [SAVE] – [FEED].
20. Call a PLU and print a label for test.
#18 How to print labels without the PLU data?
1. By weight. For example, if the desired unit price is $1.99 per LB
a. Place the item and press the [MISC WEIGHT] key.
b. Press 1 – 9 – 9 for the desired unit price
c. Press the [PRINT] key
2. By non-weight: If the desired unit price is $1.50 per piece and you want to sell 2 pcs.
a. Press the [MISC NON WEIGHT] key
b. Press 2 for the desired quantity
c. Press the [FOR] key and press 1 – 5 – 0 for the desired unit price
d. Press the [PRINT] key
3. By item count: If the set unit price is $5.00 per 2pcs but you need to sell 3pcs.
a. Press the [MISC BY COUNT] key
b. Press 3 for the desired total quantity.
c. Press the [FOR] key and press 2 for the set unit quantity.
d. Press the [FOR] key and press 5 – 0 – 0 for set unit price per 2 pcs
e. Press the [PRINT] key
Please see the video. https://www.youtube.com/watch?v=hrygvENlxYA&t=33s
#19 How to add a image or "Safe Handling Instruction" on label
Please watch the video. https://www.youtube.com/watch?v=pzpXsayQZxY
Today, I will show you how to add an image on the DLP-300 scale label using XDB Manager software.
First of all, your DLP-300 scale should be connected to XDB Manager software.
1. Open the XDB Manager.
2. Click [Config] and click [SPEC].
3. Find and click [LOGO] at the top.
4. Click [LOGO01] and click [Load].
5. Select the image that you want to add on the label. I will add the Safe handling instruction image on the label.
Please remember the file format of the image must be BMP and the size of image must be less than 10kBite.
6. Click download - select the scale # - then ok.
Once you see the 100% green bar in the Progress Bar, the image has properly downloaded.
7. Apply and save the Config window.
8. Open [LabelDesigner]
9. Open your label file or create new label for you.
10. "CLICK AND DRAG" LOGO1 from the left side menu.
11. Change values to the following.
X : 16 , Y : It's up to you.(272) , W : 439 , H : 158
12. Enter “1” as "LOGONO". This # is the logo # that you downloaded in your DLP-300 scale from steps #1~6.
13. Click Download the label format. Select the scale #. Click OK.
14. Once you see the 100% green bar in the Progress Bar, the label format has properly downloaded.
15. Test your changes by printing
#20 For first user : Shopname, Create PLU and Speedkey.
Please watch the video for first user. https://www.youtube.com/watch?v=2-FaWmbJ1j8&t=6s
** Set up the store information **
1. Press the "MODE" key twice and press the “AUTO” key..
2. Press the "PRINT" key and enter the shop number. And press the "PRINT" key.
3. Enter the first line of your desired shop information, which can be your store name.
You can clear the existing information by pressing the "C" key.
4. Press the "X" key to go to the next line. Enter the desired information for the second line.
For example, you can add either your phone number or address.
If you want to add more information, you can press the "X" key to add more lines. But normally the label format is only for two lines.
5. Press the "PRINT" key and then the "SAVE" key
6. Press the “FEED” Key.
7. The store name will be printed on the label from “2nd Label”, not 1st label.
** Create PLU : By Weight / By Count **
1. Press the "MODE" key twice and the "PRINT" key once.
2. Enter the PLU number you wish to create or edit and press the "PRINT" key.
3. Enter the PLU name (ex. RIB EYE) and press the "PRINT" key.
4. Enter the desired unit price and press the "PRINT" key.
5. Enter the PLU Type and press the "PRINT" key. * No. 0 (Weight) | No. 1 (Non-weight) | No. 2 (By count)
6. Enter the item code and press the "PRINT" key.
7. Enter the sell by date and press the "PRINT" key.
8. Enter the tare weight (if you want) and press the "PRINT" key. We pressed “2” which indicates 0.02 LB
9. Enter the qty and press the "PRINT" key. In this case, we are creating a by Weight PLU so, we put “0” as the quantity.
10. Enter the Ingredient message and press the "PRINT" key.
11. You can choose to print the “SELL BY DATE” or not. Press 1 : Print or Press 0 : Not Print
12. You can choose to print the “PACKED ON DATE” or not. Press 1 : Print or Press 0 : Not Print
13. Press “SAVE”. It’s very important to press the SAVE key every time after creating a PLU.
14. Press the “FEED” key.
** Set up Speed key **
1. Press the MODE key twice.
2. Press the X key five times then press PRINT
3. Enter the PLU number you want to assign to the #1 key.
4. Print and you can enter the PLU number you want to assign to #2 key.
5. Press SAVE then FEED.
#21 How to set it up as KG (KG calibration)
1. First turn on the DLP-300
2. Press and hold the [ZERO] key while pressing “1”+”0”+”1”+”3”.
3. Press and hold the [ZERO] key while pressing “1”+”4”+”2”.
4. Press “7”+”0”+”8” and press [X] key. And press “1” – [PRINT] key.
5. Press “7”+”3”+”5” and press [X] key. And press “0” – [PRINT] key.
6. Press “7”+”3”+”9” and press [X] key. And press “2” – [PRINT] key.
7. Press “7”+”4”+”1” and press [X] key. And press “3” – [PRINT] key.
8. Press [SAVE] key.
9. Then turn off the scale
10. Flip the scale and you will find the CAL switch cover on the bottom back side. Remove the CAL switch cover.
11. Turn on the scale and you will hear a BEEP sound.
Once you see “Booting....” on the information display, press and hold the CAL switch until you hear a short BEEP sound.
12. Wait until the screen displays all 000 and the time. Then press and hold [ZERO] key while pressing “9”+”8”+”1”+”1”.
13. Make sure that you can see “Demarcate” in the Information display. If you don’t see this, please go back through steps 1-12.
14. Press the [PRINT] key twice. You will see “SP” and “30.000” on the Total Price display.
15. Load a 30 kg weight then press the [PRINT] key.
16. The Weight Display should read 30.00. Remove the weight to make sure the weight goes down to 0.00.
Then place the weight back on to confirm that the scale is reading the weight properly.
#22 How to use AUTO, SAVE, PREPACK mode
Please watch the video. https://www.youtube.com/watch?v=NY-f_ivZLQI
[AUTO mode]
: Enable to print a label automatically for a By Weight PLU after placing a weight on the scale without having to press the “PRINT” key.
This does not work for the Non Weight PLU or By Count PLU.
1. Press the AUTO key. (The tri-mark(▼) above AUTO on the display filter should be illuminated.)
2. Recall a By Weight PLU and place an item on the platter.
3. The label comes out automatically.
4. To cancel the AUTO mode, press the AUTO key.
[SAVE mode ]
: Enable to remain PLU information after printing a label
1. Press the SAVE key. (The tri-mark(▼) above SAVE on the display filter should be illuminated.)
2. Recall a PLU. If it is a By Weight PLU, then place an item on the tray.
3. Press the PRINT key.
4. Even if you remove the item from the platter, the PLU information remains on the display.
5. To clear the PLU information press the blue C key.
6. To cancel the SAVE mode, press the SAVE key.
[PREPACK mode]
: Combination of AUTO and SAVE options. With the By Weight PLU, labels will print automatically once the weight is placed on the scale and stabilized, without pressing the “PRINT” key and when you print a label and remove the weight, the PLU information remains.
This option does not work for the Non Weight PLU and By Count PLU modes.
1. Press the PREPACK key. (The tri-mark(▼) above PREPACK on the display filter should be illuminated.)
2. Recall a By Weight PLU and place an item on the tray.
3. The label comes out automatically.
4. Even if you remove the item from the tray, the PLU information remains on the display.
5. You can put another item on the tray and the label comes out automatically.
6. To clear the PLU information, press the blue C key.
7. To cancel the PREPACK mode, press the PREPACK key.
#23 Temporary Price Change (By Weight PLU / Non Weight PLU / By Count PLU)
Please watch the video about Temporary Price Change. https://www.youtube.com/watch?v=Wfa-t0eHUl0
[By Weight PLU]
1. Recall a By Weight PLU.
2. Press the [OVERRIDE] key. (If prompted, enter the password.)
3. Enter the new Unit Price. Place commodity on the platter.
4. Press the [PRINT] key.
[Non Weight PLU]
1. Recall a Non-Weight PLU.
2. Press the [OVERRIDE] key. (If prompted, enter the password)
3. Enter the new Unit Price then press the [PRINT] key. If you want to change the quantity, too, then press the [FOR] key.
4. Enter the Quantity and press the [PRINT] key.
[By Count PLU]
1. Recall a By Count PLU.
2. Press the [OVERRIDE] key. (If prompted, enter the password)
3. Enter the new Unit Price and press the [FOR] key.
4. Enter the Quantity that is being purchased then press the [FOR] key.
5. Enter the Quantity the item is priced by and press the [PRINT] key.
#24 TARE Override/Printing Multiple Labels/PLU Type Change (By weight to By Count mode)
Please watch the video. https://www.youtube.com/watch?v=1-h_ZU6I5ZQ
[TARE Override]
1. To override a Tare Weight already programmed in a PLU, recall the PLU.
2. Place the container on the platter and press the TARE key.
3. Place commodity on the tray and press PRINT key.
[Manual TARE and Weighed TARE for MISC Item]
1. To enter a Tare weight manually, make sure there are no PLU’s recalled (scale is at all zeroes).
2. Enter the weight using the number keys and then press the TARE key.
3. Press the MISC WEIGHT key and enter the unit price.
4. Place commodity on the tray and press PRINT key.
5. To enter the Tare weight of a container, make sure there are no PLU’s recalled (scale is at all zeroes).
6. Place the container on the tray and press the TARE key.
7. Press the MISC WEIGHT key and enter the unit price.
8. Place commodity on the tray and press PRINT key.
[Printing Multiple Labels]
1. Recall the desired PLU and press the PRESET COUNT key.
2. Enter the desired number of labels to print and press the PRINT key.
3. Labels will be issued.
[PLU Type Change : By weight to By Count]
1. Recall the desired By Weight PLU and press the FOR key.
2. The PLU is now a By Count PLU. If you want, you can change the quantity or/and the unit price by pressing the FOR key.
3. Enter the quantity for purchase and press the FOR key.
4. Enter the quantity the item is priced by and press the FOR key.
5. Enter the unit price and press the PRINT key.
#25 How to print all PLU data
Please watch the video about print all PLU data. https://www.youtube.com/watch?v=LThSLuUoHqU
1. Press the [MODE] – [PRINT] key.
2. You will see “Min PLUNO Value” on the INFORMATION display.
3. If you want to print label for PLU#1 to PLU#10, then Press “1” – [PRINT] key.
4. Press “10” – [PRINT] key.
5. Press the [SAVE] key.
6. DLP-300 will print the labels from PLU#1 to PLU#10.
#26 How to connect DLP-300 to XDB manager software with "WIRED" network
Please watch the video. https://www.youtube.com/watch?v=DpP5Sgyw-P4
Set up the scale.
1. Plug a RJ45 cable(:Ethernet cable) from the scale to the router.
2. Press and hold the [ZERO] key and press “1”+”1”+”2”
3. Press the [PRINT] key, press “1” and press [PRINT] key. This number is the scale number.
4, Press the [X] key. You will see “H03”on the TARE display and “Ethernet IP” on the Information display.
5. Press the [PRINT] key then press “192”+”168”+”1”+”51” then [PRINT].
(This is the number you want to set as your scale IP address)
6. You will see “H04” on the TARE display. Press the [PRINT] key 5 times to confirm that the number is correct. (255.255.255.0)
7. You will see “H05” on the TARE display. Press the [PRINT] key 5 times to confirm that the number is correct. (192.168.1.1)
8. You will see “H06” on the TARE display. Press the [PRINT] key 5 times to confirm that the number is correct. (192.168.1.1)
9. Press the [SAVE] key.
10. If you have more scales, please follow the same steps above.
Remember, the scale IP address (#4) should not be same for each scale.
Connecting the DLP-300 scale with XDB manager software
1. Plug a RJ45 cable(:Ethernet cable) from the PC to the router
2. Set up or find your PC IP address. Go to Network – Change adapter options.
And go to properties. Click TCP/IPv4 – Properties. Then you can change or see your PC IP address. (Ours is 192.168.1.50)
3. Open the XDB Manager software.
4. In the section [Dept-Mg-Scale], right click and select [Add DEPT].
5. Fill out the Dept No. and Dept name. And press [Save] then [Close].
6. Right click on the Department. And select [Add MainGroup].
7. Fill out [MG NO.] and [MainGroup Name]. Select the Department. And press [Save] then [Close].
8. Click the Department "DB MART" and right click on "MEAT" and select [Add Scale].
9. Fill out the [ScaleNo] and the [IP Address] for the scale IP address.
We put NO.1 and “192.168.1.51” for the scale IP address. And press [Save] then [Close].
10. Click the Department "DB MART" and right click on "MEAT" and select [Add Scale].
11. Fill out the [ScaleNo] and the [IP Address] for the scale IP address.
We put NO.2 and “192.168.1.52” for the scale IP address. And press [Save] then [Close].
12. Go to the XDB Manager. Click “TCP/IP” on the top menu bar and click “NetworkDetect”.
Then under “Scale List”, select all scales that you want to check the connection. Then click [OK].
Once you see the 100% green bar for “Network Test” in the Progress Bar on the right, then your DLP-300 scale is connected correctly to your PC.
13. Search “CMD”(or “Command Prompt”) on your PC to run Command Prompt. Enter “ping 192.168.1.51” And press ENTER.
If you get a reply, then your DLP-300 scale is connected correctly to your PC.
If you want to check another scale, then repeat step #13.
14. You just finished adding a scale to the XDB manager software.
Now, I will show you how to add a PLU to the XDB manager.
Enter the PLU #, Item Code, Name, Unit Price, and press the [SAVE] key. You can add some Ingredients as well.
15. Let’s try to download PLU data for testing. Click “TCP/IP” on the top menu bar of the XDB manager.
16. Click “Download All PLU” and click the scale #. Then click [OK].
17. Once you see the 100% green bar in the Progress Bar on the right, the PLU data has properly downloaded.
You will be able to recall PLU data from your scale.
#27 How to fix "Check Min Wt."
Please watch the video about "Check Min Wt." https://www.youtube.com/watch?v=x66jqz_vVoE
1. Press and Hold [ZERO] key and same time press "1"-"0"-"1"-"3"
2. Press and Hold [ZERO] key and same time press "1"-"4"-"2"
3. You will see "SP501" on WT display.
4. Press "5"-"1"-"2" and press [X] key.
5. You will see "Min d Printing W" on information display.
6. Press "1" and press [PRINT] key.
7. Press [SAVE] key.
8. Press [C] key.
#28 How to copy DATA from one DLP-300 scale to another DLP-300 scale
Please watch the video. https://www.youtube.com/watch?v=ZNfmqRp5LYU
1. Connect the USB drive to the scale ①. The USB drive should be formatted to be a FAT type, not NTFS type.
2. You will see the [▼] over the [USB] on the display.
3. Press the [MODE] key three times and press the [OVERRIDE] key four times.
4. You will see “Z13” “Backup” on the display and press the [PRINT] key.
5. Press “1” and the [PRINT] key to download all settings.
6. Press “1” and the [PRINT] key to download the Network setting.
7. Press “1” and the [PRINT] key to download all Label Format.
8. Press “1” and the [PRINT] key to download UDF BCD Format(User Defined Barcode Format).
9. Press “1” and the [PRINT] key to download the Main db(database).
10. Press [SAVE] to Back up.
11. Connect the USB drive to the scale ②.
12. Press the [MODE] key three times and press [OVERRIDE] key three times.
13. You will see “Restore” on display and press the [PRINT] key.
14. Press “1” and the [PRINT] key to restore all settings.
15. Press “1” and the [PRINT] key to restore the Network setting.
16. Press “1” and the [PRINT] key to restore all Label Formats.
17. Press “1” and the [PRINT] key to restore the UDF BCD Format(User Defined Barcode Format).
18. Press “1” and the [PRINT] key to restore the Main db(database).
19. Press [SAVE] to restore and press the [FEED] key.
20. Now you can see that the data has been copied.
(PLU, Network setting and so)
If you want to copy only PLU data,
1. Press the [MODE] key three times and press the [OVERRIDE] key two times.
2. You will see “Z15” “Save PLU to USB” on the display and then press the [PRINT] key.
3. Press “1” and press the [SAVE] key.
4. Connect the USB drive to the scale ②.
5. Press the [MODE] key three times and press the [OVERRIDE] key.
6. You will see “Z16” “Load PLU from USB” on the display.
7. Press “1” and press the [SAVE] key.
8. Now you can see all PLU data on the scale ②.
#29 How to print or not print PACKED ON DATE and/or SELL BY DATE on the label
Please watch the video. https://www.youtube.com/watch?v=aJ4908wDIW4
If you don’t want to print “PACKED ON DATE / SELL BY DATE” on the label, please follow these instructions.
First, use the shortcuts key for all PLUs.
1. Press the shortcut key # ①. The “PACKED ON DATE” will be printed on the label.
2. Press the shortcut key # ②. The “SELL BY DATE” will be printed on the label.
3. If press the key # ① again, the “PACKED ON DATE” will not be printed on the label.
4. If press the key # ② again, the “SELL BY DATE” will not be printed on the label.
5. These shortcuts are only possible if the scale version is greater than V1.0.3.0. To check the version of your scale, press “1” - “4” - “5”.
Secondly, change the setting by PLU.
1. If you want to print the “PACKED ON DATE” and the “SELL BY DATE” of PLU #1, press the [MODE] key twice.
2. Press [PRINT] - “1 (;PLU#)” and then press the [PRINT] key again.
3. Press the [PRINT] key 7 times to find “Print Pack Date” and “Prt Sell By Date” and then press “1” for printing or “0” for not printing. Then press the [PRINT] - [SAVE] key.
4. If you can’t see “Print Pack Date” and “Prt Sell By Date” while pressing the [PRINT] key,
press the [FEED/ESC] key and then press the [OVERRIDE] key. You will see “PLU Fields Visibility” on the display.
5. Press the [PRINT] key, press the [OVERRIDE] key 6 times. You will see “Print Pack Date” on the display.
6. Press “1” for printing or “0” for not printing. And then press the [PRINT] key.
7. Press the [OVERRIDE] key 4 times. You will see “Prt Sell By Date” on the display.
8. Press “1” for printing or “0” for not printing. And then press the [PRINT]
9. Press the [SAVE] - [FEED/ESC] key.
#30 How to import PLU data from Excel to XDB Manager
Please watch the video. https://www.youtube.com/watch?time_continue=4&v=cgx0MuuxcN8&feature=emb_title
1. Go to www.Visiontechshop.com and find DLP-300 scale from the BEST Selling models.
2. Scroll down and Click the Download tab under product image.
3. Click “Template DLP-300 PLU CSV File“ to download the template of PLU data.
4. Open Template DLP-300 PLU CSV File.CSV.
5. Enter your PLU data.
6. Item code is for barcode on the label. You must enter the item code. Otherwise, the barcode will not be printed on the label.
7. If you want to print “SELL BY DATE” on the label, please enter “1” on “Print Sell By Date” column. If NOT, enter “0”.
8. If you want to print “PACKED DATE” on the label, please enter “1” on “Print Pack Date” column. If NOT, enter “0”.
9. [Important!] You must save the file as “CSV” file, not “XLS” file.
10. Open the XDB Manager program.
11. Click [PLU] and Click [PLUImportConfig] on the top.
12. Click “Open” and change the file type to “CSV Text File(*.CSV)”. Select and open “Template DLP-300 PLU CSV File.csv”.
13. Match the Import Field and Index with CSV File.
14. Main Group No is 1st column. So, click “Enable” on MainGrpNo and enter “0” on “Index”
15. PLU No is 2nd column. So, click “Enable” on PLUNO and enter “1” on “Index”
16. PLU Name is 3rd column. So, click “Enable” on Name and enter “2” on “Index”
17. PLU type is 4th column. So, click “Enable” on PLU Type and enter “3” on “Index”
18. Do same way with other field. If CSV file doesn’t have the information, then uncheck “Enable” and enter “-1” on “Index”.
19. Click [Apply] and [Save].
20. Click [Import PLU] and click “Yes”.
21. After import all PLU data, click “OK”.